

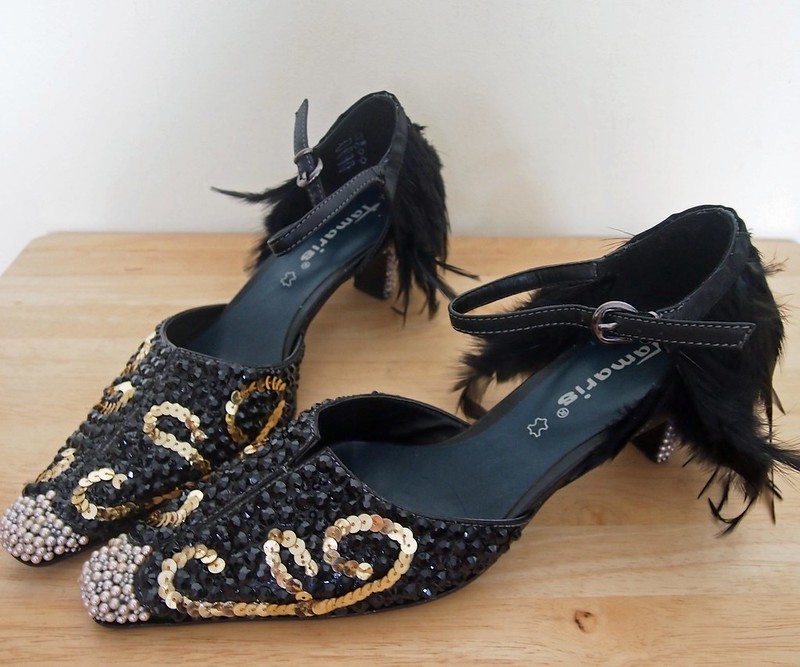
As part of my first History of Fashion/Customisation project at the London College of Style, I was charged with sourcing a pair of 1920s-inspired vintage shoes (plus trims galore) and transforming them into a sight to make a flapper weep (preferably with joy)... and here are the results. As you may be aware, I've dabbled in shoe doctoring in the past, so, this time, I decided to raise the bar a bit, and set myself my biggest DIY challenge to date - beads, pearls, sequins, feathers... and not an apron in sight (#livingontheedge). Read on for all the deep, dark secrets on how I did it...for under £25.


1. Gather your weapons
You will need:- 1 x pair of shoes (I won this black leather pair on eBay for £9.29, including delivery). The white-stitched sectioning inspired my pearl-encrusted toe-cap and "mirrored" sequin curlicue designs, but you could easily mark these sections onto your own shoes before you start.
- Gold sequin string - this set me back £1.29 for 5m!
- Flat back black rhinestones - I used 2 different sizes to add texture - these are 3mm and 6mm, 99p per pack.
- Flat back pearl beads - again, I used 2 different sizes to add interest - these are 2mm (99p) and 4mm (£1.30), in "champagne".
- Feather trim - this cost me £3.50 for 30cm, including delivery.
- Glues - I used Evo-Stik Leather Adhesive (£2.63) for the main body of the shoe, and Scotch Quick-Dry Tacky Adhesive (£3.16) for the heel - feel free to use your own preferred adhesives, but one advantage of these two is that they both dry clear!
- Tweezers
- Scissors
(Total Outlay: £24.14)
2. Add your sequins
Spread a generous layer of leather glue over the area in which you wish to locate your sequin design. Cut sequin string to desired length, and arrange in your chosen pattern (my curlicue design was inspired by a motif I spotted on an oriental-style 1920s costume). The glue is tacky, so you'll have some time to play around if your positioning isn't quite right straight off!
3. Add your black stones
Spreading a generous layer of leather glue over the area of the shoe on which you're currently working, gradually cover the main side sections, in-between and around the sequins, with your black rhinestones. I primarily used the larger stones, dotting a few of the smaller ones in to add texture (and fill in gaps!). Fingers are fine for the 6mm stones, but you'll need tweezers for the little ones. N.B. After completing one side of each shoe, I worked on the toecaps, to give the black stones a bit of time to "fix" before starting on the opposite sides.
4. Encrust your toecaps
Working in exactly the same way, cover the toecap section of each shoe in the flat back pearl beads.
5. Bling up your heels
Since I was no longer working on leather at this point, I used my all-purpose tacky PVA for this bit. Spread on a generous layer (don't worry, it does dry clear!), and pop your pearls into position, using the tweezers. This stage was a bit trickier, since this glue was, and stayed, much wetter, for much longer, than the leather glue - so the tiniest knock would send the pearls careering all over the place!
6. Finish with feathers
Once the heels are touch-dry, cut a length of feather trim to fit each shoe, long enough to fix around each ankle-back, from ankle strap to ankle strap, with an extra 1cm at each end to tuck inside the shoe (30cm of trim was just enough for this pair). Spread leather glue along the length of the ribbon trim, and along the edge of the shoe. Press into place - over the next 10 minutes or so, spend a few minutes, on and off, pressing the ribbon section firmly into place, particularly where it tucks inside the shoe, to ensure a firm hold. This isn't necessary in the case of the stones or pearls, but I think it really makes a difference here. You might want to trim your feathers, depending on heel length, but, personally, I fancied that the "trailing-along-the-floor" element added to the opulent "Jazz Age" feel...
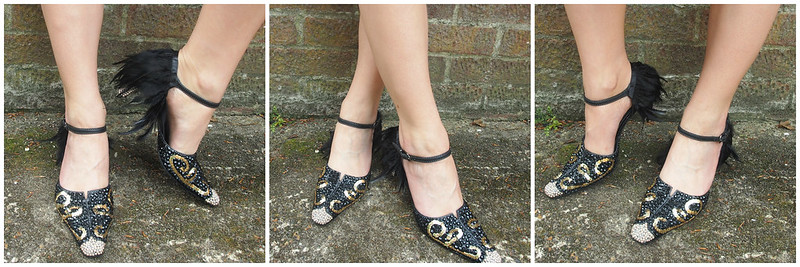
Et voila!
Wait 24 hours before trying on to allow all bonds to fully adhere. Then go Charleston!

How do you feel about '20s style? Have you got crafty recently?


Best Leather Glue
ReplyDelete