Showing posts with label Tutorial. Show all posts

Wednesday, 19 June 2013

DIY Embellished Sunglasses, 2 Ways

Always meaning to get around to breezing through one of those effortlessly creative days fashioning works of wonder that other bloggers seem to have so often, but can never quite seem to spare the time? I have discovered the answer! Simply set aside a day to accomplish all those niggly admin tasks you've been putting off for weeks. The results will astound you - you will instantly experience a compelling urge to ferret out those neglected baubles, breathe new life into that coagulating glue, and touch neither pen nor paper, keyboard nor phone until the surface of every conceivably customisable accessory in your possession is festooned with pearls and enamel flowers (er, just me?). OK, you may not have made much of a dent in your To Do list, but you will have some beautiful new toys!

Thus began the story of how "just 10 minutes of DIY before I crack on with my spreadsheets" turned into 2 pairs of embellished sunnies - worth it? Hell yes! (Thankfully, though, I have now almost run out of supplies, so may get something productive done before my next eBay haul pops through the letterbox!)
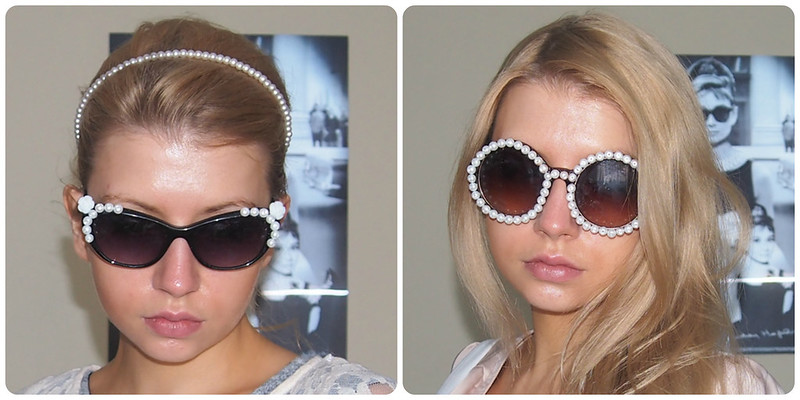
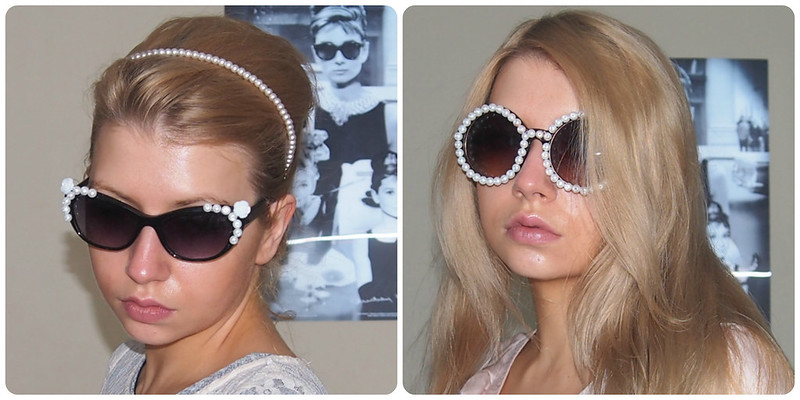

Cool Cat

A couple of summers ago, I spent weeks, if not months, searching for the perfect pair of cat-eye sunnies, before snapping these up, along with their white counterparts, for a ridiculously low price in the Accessorize sale. This year, though, I couldn't help but have my head turned by the incredible embellished versions popping up everywhere... Rather than abandon my trusty companions for pearlier pastures, I decided, why not revitalise them to my bespoke specifications, for a fraction of the cost of a new pair? I already had some pearl beads and rose-shaped enamel buttons, intended for a sewing project I'd never quite had the guts to begin (baby steps...), so what was to stop me? (Certainly not that pesky spreadsheet.)
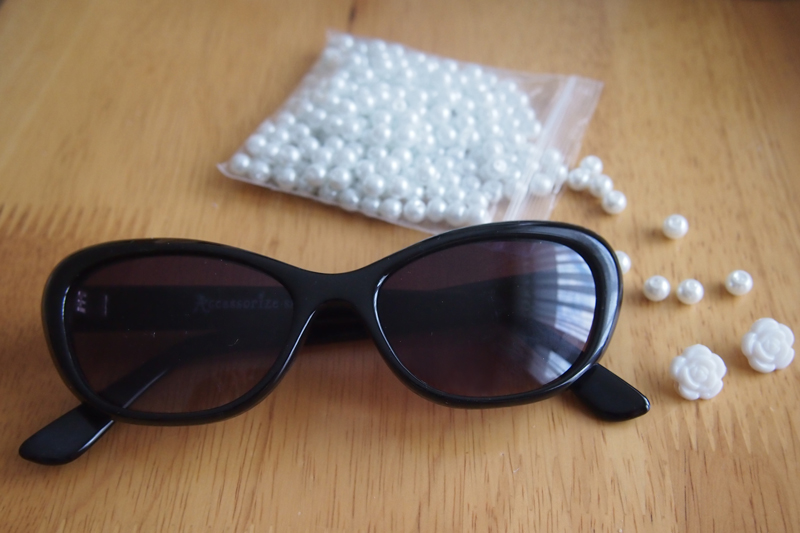

You Will Need:

  • Cat Eye Sunglasses - I decided to use my black ones for an on-trend monochrome look, to make the white trimmings "pop", but you could go all-white, or even coloured if you will!
  • Pearl Beads - Mine had holes, since they were designed to be sewn onto fabric, but they also had slightly flatter surfaces around the holes, which made the gluing process a lot easier than it might otherwise have been. You can buy the ones I used from eBay here, or flat-back ones here.
  • Small Resin Roses - You can buy flat-backed versions from eBay, but, again, mine were designed to be sewn onto fabric, button style - however, this had the fortuitous outcome that the back fastening provided an extra surface to adhere to the sides of the frames, allowing them to be affixed more securely. 
  • Glue (ignorant of whatever the go-to-solvent amongst craft natives may be, I went on familiarity: Super Glue)
  • If you are not intimately familiar with a glue gun: plastic gloves, something to protect your work surface, and something to practise gluing your first few beads on (- the first thing I managed to stick together? My fingers). And if I was to do it again, in a less impatient mood? I'd cut a couple of pieces of paper or cloth to fit the lenses, in an attempt to avoid the inevitable glue damage (- seriously, is it just me?!).
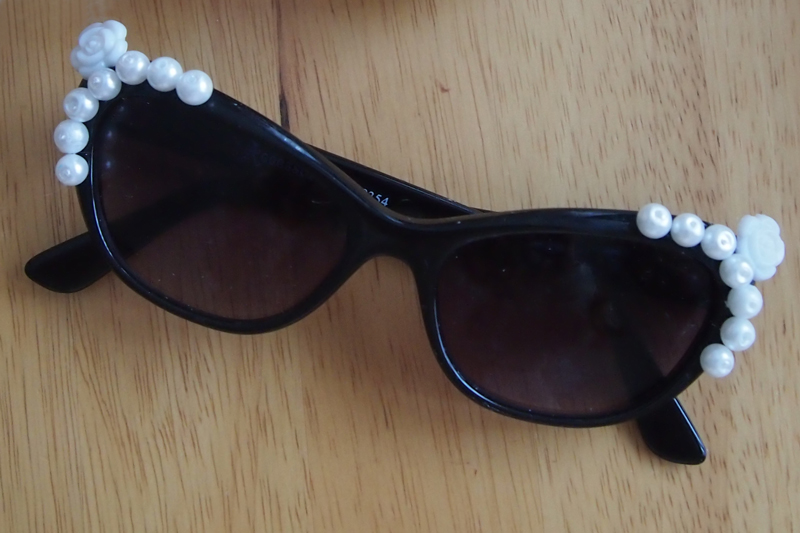

How To:

  • Carefully glue adornments into desired positions - I concentrated on the outer corners to emphasise the cats-eye shape; position roses at the tips, with around half protruding over the edge, for an exaggerated feline flick.
  • One by one, dot a small amount of glue onto the surface of each bead (a little more on the roses), then press firmly into desired position on frame until it feels secure. I've read tutorials demanding 2 minutes per bead, but I found 10 seconds sufficient for most - the surfaces of some of the beads were a little uneven, though, which caused me to abandon a few!
  • Leave to dry overnight. 
  • Don, accompanied by monochrome ensemble, beehive and daydreams of '60s movie-stardom.


And Around We Go...

Once I'd gotten my creative groove on, the urge to create my very own pearly-all-rounders, a la those vintage Chanels resurrected by Rihanna, was impossible to ignore. At £2, I was prepared to sacrifice last year's Primark tortoiseshells to the cause...
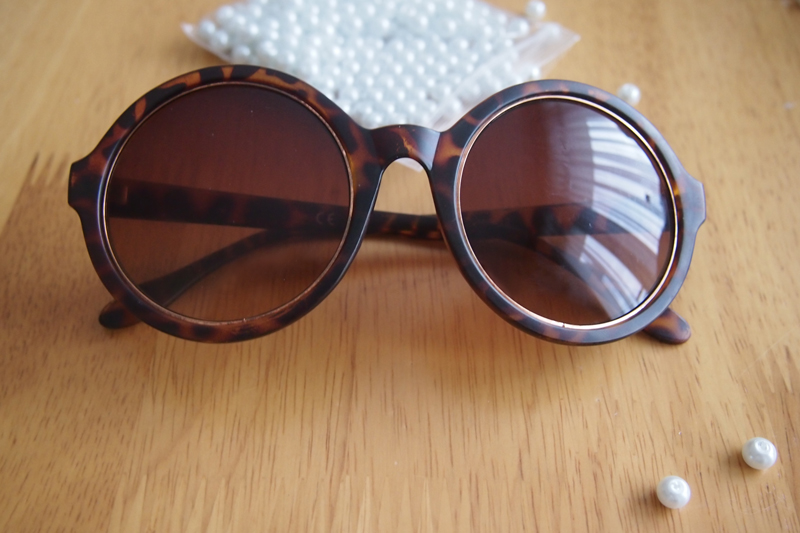

I used the same pearl beads, and the same procedure, as for the cat-eye versions, although, due to the sheer number necessary, this pair took a lot longer to complete (1 hour 45 minutes, compared to 45 minutes for the others). Although referencing '90s Chanel, I feel like the round lenses give them a '70s vibe - bring on the flares?


So, did they survive The Ultimate Test: leaving the house? I'm happy to report that the answer is yes, without the loss of a single bead (*air punch*).
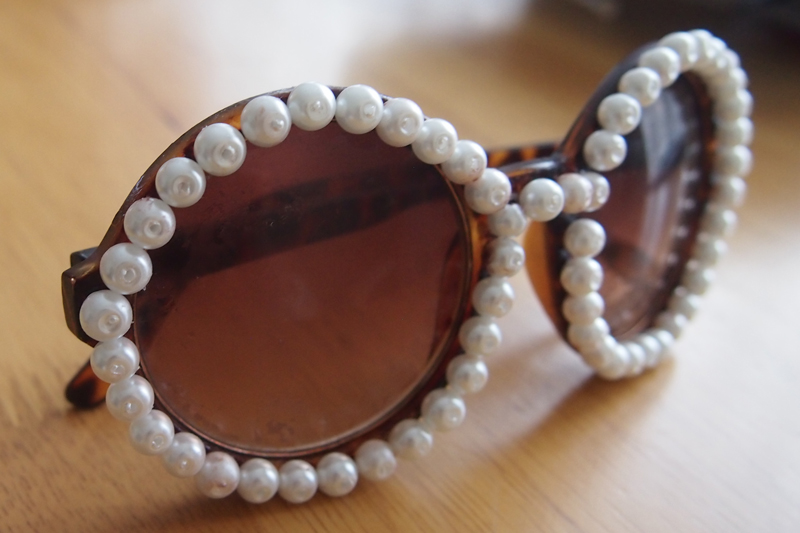


Will you be trying out the embellished sunnies trend? DIY or high street buy..? I have to admit that, even if the results aren't quite perfect, I'm definitely growing to appreciate the feeling of creating something myself, over and above the money I save (and the hours of blissful admin-ignorance I gain)... it almost equals the feeling of pride I felt surveying my castle constructed from loo roll in 1989...


Follow Me:

 Follow Me On Bloglovin’RSS FeedFacebookInstagramPinterest

Thursday, 13 June 2013

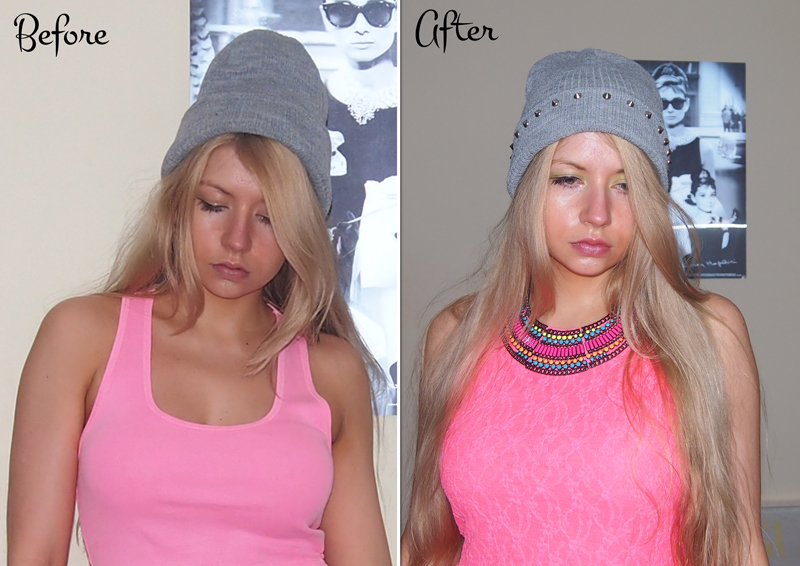
DIY Studded Beanie

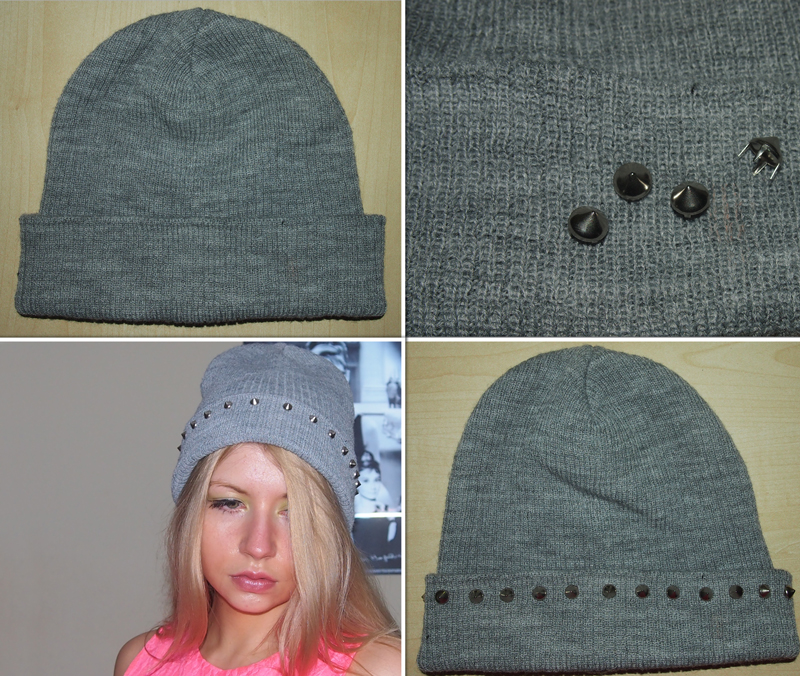
The second product of last weekend's DIY power hour (and a half) was a newly spiky incarnation of my newly beloved grey beanie (don't worry pinky, I have big plans for you too). My personal preference when it comes to DIY is maximum bang-for-buck in terms of time and effort (as well as bucks), and studding fits the bill perfectly. I used the studs left over from embellishing this dress - definitely purchasing more for future projects!


You Will Need:

  • Beanie (I was lucky enough to pick this one up in my New Look AW13 Preview goody bag, but you can get it for £4.99 here)
  • Studs (available from eBay here)
  • Knife (you'll only need to use the handle, so any kind, preferably blunt!)


How To:

I used exactly the same procedure as I did when customising the dress in my earlier post - it doesn't really get much easier!

  1. Decide where to position your studs - the ribs on this beanie are a helpful spacing guide!
  2. If studding the turn-up, turn hem up to desired level (I kept my studs fairly close to the edge so that I could vary the width of my turn-up). Make sure your folding is fairly even!
  3. One at a time, fix studs in desired positions by simply pushing their four "legs" through the fabric. Partially flip the turn-up back over so that you can press the legs down and in on the underside to secure. Use a knife handle to save your fingers the stress (or anything else you have to hand - I used a plundered gift card which was lying around after falling victim to an earlier online spree!).

Such a simple yet satisfying way to give pretty much anything a facelift... and I just noticed these neon versions - oooooh... Have you got your stud on yet? 


Follow Me:

 Follow Me On Bloglovin’RSS FeedFacebookInstagramPinterest

Sunday, 9 June 2013

DIY Neon Necklace

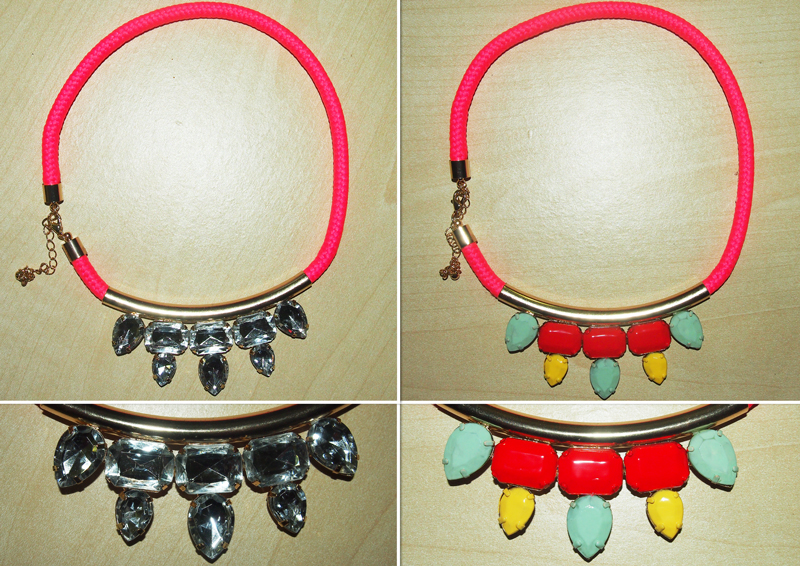
I was well and truly bitten by the DIY bug this weekend, polishing off 2 projects in 1.5 hours (look out for my first customised beanie, coming soon to a screen near you), and planning several more... One thing I'd wanted to try out for ages was using nail polish to remaster a clear crystal/diamante necklace in glorious technicolour, so, as nice as this £3 Primark crystal-on-neon-cord choker was already, as soon as I laid eyes on it, all I could see was the perfect canvas...


You Will Need: 


  • the piece of jewellery to be customised
  • nail polish in the shade(s) of your choice
  • clear topcoat
  • nail polish remover and cotton buds (in case of mishaps!)


The process is almost shockingly simple - before starting, I scoured the net for tutorials, looking for the catch, but it really is this easy: paint the stones in your desired colours, as if painting your nails. Speaking as someone for whom manicures typically produce more frustration than Primark's perennial disco pant shortage, it was remarkably stress-free (and, fingers crossed, the results will last longer than the few hours I get from my nails).

I used Barry M Gelly Hi-Shine Nail Paint in Satsuma, and Marks & Spencer Nail Colour in Neon Yellow (think this has been discontinued, sadly) and Mint. The thick, high shine quality of the Gelly polishes makes them perfect for projects like these - I used 2 coats, but 1 probably would have sufficed. 3 coats of the yellow and mint polishes were necessary for an even finish (not bad, considering I've had them for 3 years!!). For an opaque, even look, you'll probably need to use thicker coats than you would on your nails, so, to eliminate any risk of last minute nicks and smudges, I left mine to dry overnight before applying topcoat.

Although I was lucky enough not to have any accidents (starting with relatively large stones was probably a good idea!), I had nail polish remover and cotton buds on hand as a safety net, just in case! A potential lifesaver if/when attempting more intricate designs, I imagine...


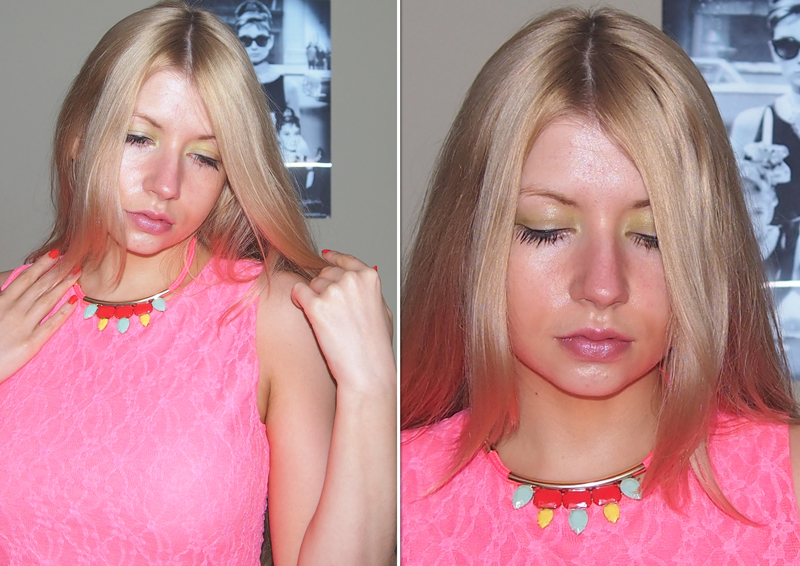
I'm really pleased with the results (well, how often can you co-ordinate your nails so effortlessly with your accessories?), especially for a first attempt, but I'm already itching to take it to the next level with some special effects and custom designs... after all, who says we have to stick to neon, block colour, or necklaces, for that matter? I have a feeling that bespoke jewellery may well turn out to be a more rewarding medium for my burgeoning nail art skills than my slippery-as-butter-fingernails!


Have you gone extra-curricular with your nail polish yet?


Follow Me:

 Follow Me On Bloglovin’RSS FeedFacebookInstagramPinterest

Thursday, 2 May 2013

St Moriz Review + My Foolproof Fake Tanning Guide

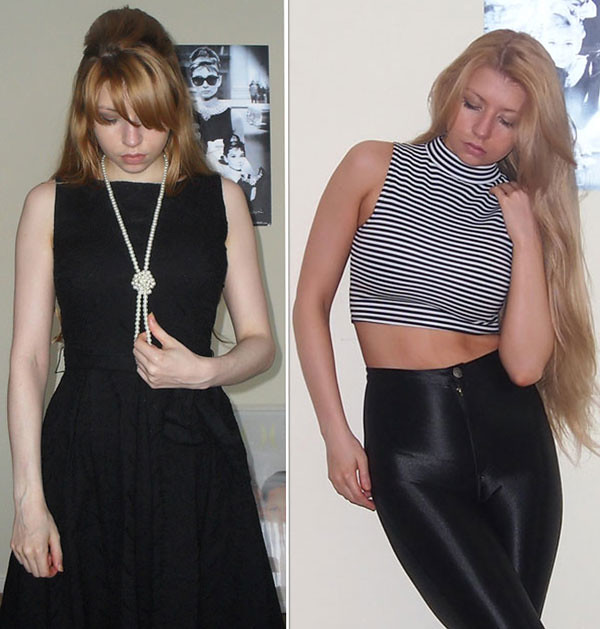
As our collective hopes of finally ditching black opaques for a few months are probably rising right now, along with a few reservations about bearing skin that's spent too many months hidden under layers of nylon and wool (well, if you haven't unapologetically spent pretty much the whole winter in crop tops anyway, as I have!), I thought this might be a timely post. As much as I admire the unflinchingly porcelain complexions of the likes of Florence Welch, I have to admit to being a dyed-in-the-wool (or from-the-bottle) fake tan addict. I can manage cold (and alabaster) turkey for a few weeks (see below left), but can never hold out on my golden glow cravings for long (see below right), and have been pretty much permanently bronzed for the last decade, despite retreating to the nearest parasol whenever temperatures hit 20C. 


But there are absolutely no excuses for resembling a tangerine, whatever your budget! Over the years, I've tried most of the tanning big-hitters (St Tropez, Fake Bake, L'Oreal, Xen Tan) and pretty much every modality (pro and D.I.Y. sprays, lotions, mousse...) with acceptable, pretty much interchangeable, results from them all, and was resigned to spending £30+ a month on upkeep... until I came across the Cosmo paragraph that changed my life a couple of years ago, introducing me to St Moriz. 
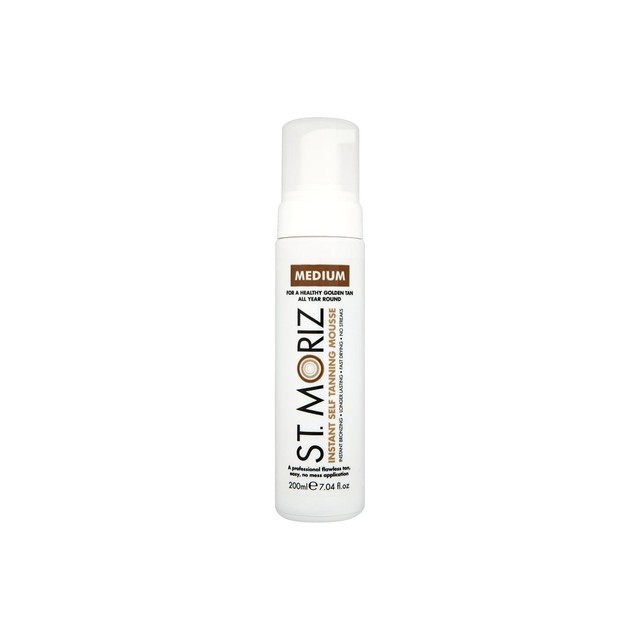
£2.99 (saving around 90% on the prices of brand leaders) from Savers, Amazon or TJ Hughes, I find its results equivalent to, or, yes, even better than those of the aforementioned big names, and the bottle goes further too (I use the mousse, having always liked these best for self tanning).

To obtain optimum results using any self tanner, you do need to put a bit of work in though, so I thought I'd share my top tips (to enable you to avoid recreating the Snow White-to-Pocahontas-to-102nd Dalmatian transformation I underwent on my first attempt!).


7 Steps to the Perfect Faux Glow

  1. EXFOLIATE - This is the most important thing you can do to obtain a natural, even look and maximise your tan's lifespan. Exfoliate your whole body pre-application, paying special attention to hands, feet, ankles, knees and elbows. You can experiment with loofahs, scrubs etc, but I use a good ol' flannel whilst soaking in the bath, then finish off with another once-over in the shower using a (non-oily) body scrub.
  2. MOISTURISE - Very important, as this is how you avoid orange knees and elbows! Just before you begin applying your tan, moisturise your face, elbows, hands, knees, ankles and feet. Unless you have very dry skin, don't moisturise any other areas of your body, as this will dilute the effect of the tanning agent.
  3. WEAR GLOVES - And this is how you avoid orange palms! You can buy disposable vinyl gloves cheaply from most supermarkets. Some people prefer to use a mitt, but I don't find that they add anything beneficial to the process or results, and, if you're not wearing gloves too, the tan can still soak through and Tango your hands! Last thing, carefully peel them off, slap on some moisturiser and squeeze a tiny amount of fake tan onto the back of one hand - rub the backs together to spread carefully over both hands and between fingers.
  4. TIME IT RIGHT - I have been known to go out clubbing after a hasty application, but I wouldn't recommend it - use a wash-off version if you must! After applying a standard self-tanner, you need to wait at least 20 minutes before dressing/sitting down, and 4 hours before showering. If you apply it before bed, be warned that it will rub off on your sheets - I now only buy black bed linen - and it's best to cover up as much as you can (with loose, soft clothing) to avoid any unwanted palm/hair stains in the morning. If you have a lazy day that you can spend wafting (carefully) around in a black maxi dress, great!
  5. CONTOUR - It will probably take you a while to figure out the perfect application technique and "dosage" for you - everyone's skin is different. It doesn't need to appear perfectly even when wet - this colour is just a guide, not how your actual tan will look - but ensure every inch of your skin has been covered, aside from palms and soles - there's nothing worse than a white armpit! Start with one coat and see how you go - I stick to one or two coats, but it's all too easy to become tanorexic - if people start comparing you to daytime auction show presenters rather than asking if you've been away, you probably need to tone it down! You might want to try using more along the sides of your torso and limbs to cheat a slimmer look. Layering additional coats on over consecutive nights is meant to make your tan last longer. I top mine up with a single coat of Garnier Summer Body the morning after. I never use more than one coat on my hands, feet, knees or elbows though - you have been warned! 
  6. BE PREPARED FOR ONGOING UPKEEP - You should use a rich body moisturiser every day (I like the Jergens range) to maintain your tan, and avoid overly hot baths or showers. Most companies claim that by exfoliating "gently" every few days, followed by a reapplication, you can maintain a perfect tan indefinitely. Personally, I think this is a big fat myth - it's incredibly hard to exfoliate at all without inadvertently revealing any glaring white patches! Mine lasts for around 7 days before it begins to peel off in key areas (neck and wrists tend to come first for me), which I take as my cue for another full body exfoliation a la step 1, before I start all over again. Scrubbing off all traces of tan takes me about 45 minutes - soaking in a hot bath for a few minutes first helps to loosen the topmost layers of dead skin so you don't have to work so hard. 
  7. WATCH THE FACE - What looks great on your body won't necessarily work so well on your face -  despite my years of experience, I found it hard to avoid patchiness and clogged pores until I started using products specifically designed pour le visage. Fake tan tends to fade more quickly from the face, but doesn't tend to go patchy - phew! I now use Xen Tan Face Tanner Luxe, which gives great results, is infused with skincare benefits and smells delicious (as do all Xen Tan products actually, one area in which they most definitely beat the competition hands down), and treat jawline up completely separately from neck down, tanning as and when necessary in each case. 


Admittedly a commitment, but a tough addiction to beat once you get hooked... I accept no responsibility for any subsequent substance dependence.


Are you embracing pale and interesting this summer, or going for gold?


Follow Me:

 Follow Me On Bloglovin’RSS FeedFacebookInstagramPinterest

Wednesday, 16 January 2013

How to Do My No-Backcomb Beehive

OK, cracking on with resolution #1 (more hair and DIY posts), I thought I'd show you my take on the beehive. I don't know about you, but I hate backcombing - I can never seem to do it properly, and, if I do (or, more likely, someone else does), brushing it out takes about 3 hours and involves many breakages... So I have to get a bit creative if I want to try out my favourite retro 'dos. This is how I create my much-easier-than-it-sounds-or-looks full beehive up-do. It's a great day or evening look for day (or two) old hair, suitable for anyone with shoulder-length or longer hair. Slightly messy is, thankfully, acceptable for an effortlessly chic look, or you can go super-neat for a Grace Kelly feel.


You Will Need:

  • Dry shampoo (optional)
  • Brush or comb
  • Hair elastic (ponytail holder)
  • Hair doughnut (optional)
  • Kirby grips
  • Hairspray (optional)

    How To:

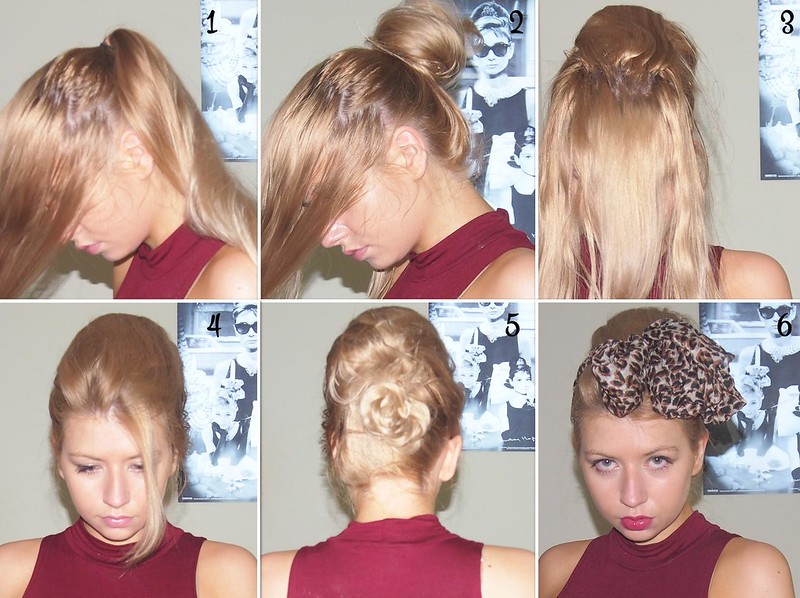
    1. Apply dry shampoo, if you have it, to give your hair some "guts" in the absence of backcombing. Section hair into two sections, front and back, from ear to ear - this doesn't have to be too neat, as no one will see this bit! Pull back section into a high ponytail.
    2. Twist ponytail into a bun - ideally, use a hair doughnut for added padding and shape (slip it over the ponytail, then wrap the ponytail around it section by section  - I usually divide into 3 or 4 - pinning the ends underneath as you go).
    3. Begin to drape sections of hair from your "front" section up, over and around the bun (yes, this is the front view - you can use sectioning clips if you prefer more vision!). Pin securely at the base of the bun. I tend to start with the "back" of the front section, followed by the front and sides.
    4. Continue until the entire front section has been pinned - you can leave your fringe or front sections loose if you so desire. Mist with hairspray for extra hold.
    5. If you have very long hair like mine, you might be left with some loose ends - if you're very meticulous, you can try and "tuck" them in as you go - otherwise, do whatever you like with them - this time, I put mine in a braid, which I then coiled up and pinned beneath the beehive.
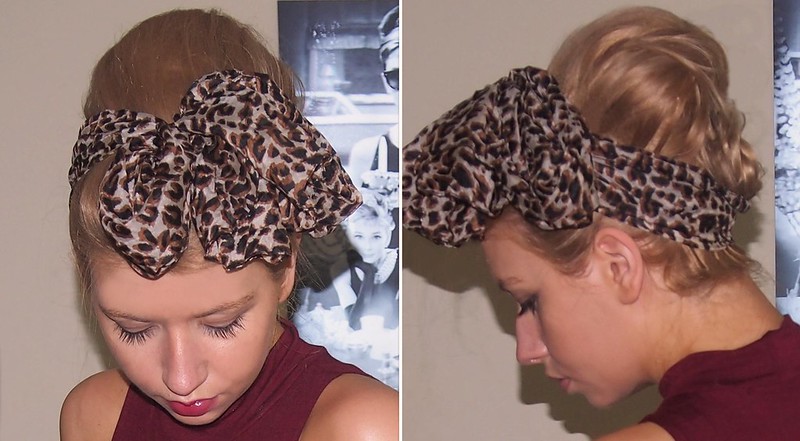
    6. Although you can leave as is, beehives look great with hair accessories - slides, Alice bands or a silk scarf for extra vintage va va voom (and/or to cover up not-so-neat sides!). Red lipgloss optional.


    Follow Me:

     Follow Me On Bloglovin’RSS FeedFacebookTwitterInstagramPinterest