Showing posts with label DIY. Show all posts

Sunday, 7 June 2015

Prints Charming: Styling my First Editorial...

Pattern Clash Editorial Behind the Scenes
A peek behind the scenes...

I'm sooo excited to finally be able to share the results of my first editorial shoot! Before starting at LCS - I'll be honest - the thought of styling men had never really crossed my mind, and the editorial work I'd come across by former students had left me feeling a little daunted, to say the least - could I ever hope to match that level of creativity? So the sheer amount of fun I had putting this look together came as a very big, but very pleasant, surprise (not to mention the sheer level of obsession which consumed virtually all waking (and sleeping - I genuinely dreamt of paisley) hours between brief and shoot.

Mood Board
My Mood Board

The brief was "Pattern Clash" - beyond this, we were free to take our creative vision wherever our imaginations might roam (whilst ensuring we remained within the remit of "fashion" by taking current runway and editorial trends into account). Three weeks of scouring street and web, despairing at the high street's dearth of printed menswear, setting my alarm to nab vintage gems on eBay and tarring (well, OK, glue-gunning) and feathering my favourite fedora later, and my Aristocrat on an Acid Trip look (inspired by a combination of influences from '60s psychedelia to Etro's paisley-centric rebel-luxe aesthetic) was complete. Now I just had to hope and pray for a model with long hair...

Pattern Clash Editorial 1

Result! Nevs sent over the lovely Henry Ashton, who carried off paisley-on-paisley-on-paisley-on...paisley with aplomb... with a nice little tonal gold-on-gold-on-gold touch courtesy of his luscious locks coming in as a bonus.

I think, however committed you are to your creative vision, it's tough not to second-guess your own work when it comes to the crunch, and lots of niggly little last minute doubts crowded in as the shoot approached - Does this really work with that? Is that just too much? Cravat or pussybow? Should I tilt his hat a fraction more? - to the effect that I was filled with equal parts excitement and trepidation in anticipation of the final images...

LCS_PATTERNS_SHOT_03_091
Photos: Cicci Feinstein

So for our lovely principal, Wendy, to tell me she could see this shot in a magazine, right now... I was over the moon and back! And really rather tempted to do a bit more with menswear... Do you think, if I try really hard, I can make paisley-on-paisley-on-paisley-on-paisley mainstream..?


Join Me On:

 Follow Me On Bloglovin’RSS FeedFacebookInstagramYouTube

Wednesday, 6 May 2015

DIY: 1920s-Inspired Embellished Shoes

Customisation, Embellished Shoes, Beaded, Sequin, Pearl, Feather, Art Deco, Jazz Age, Flapper, Toe Cap, Heels, 1920s, Vintage Style, How To, DIY, UK Fashion Blog, London Style Blogger, Sam Muses
DIY 1920s Inspired Embellished Shoes 2

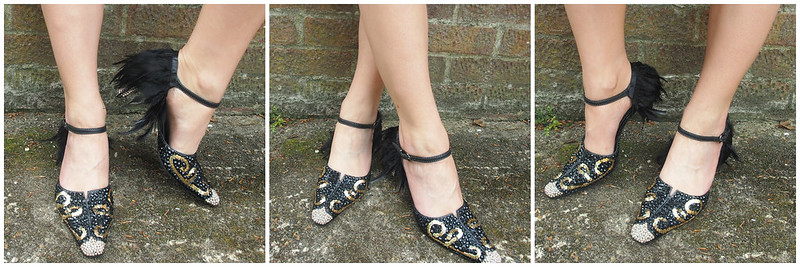
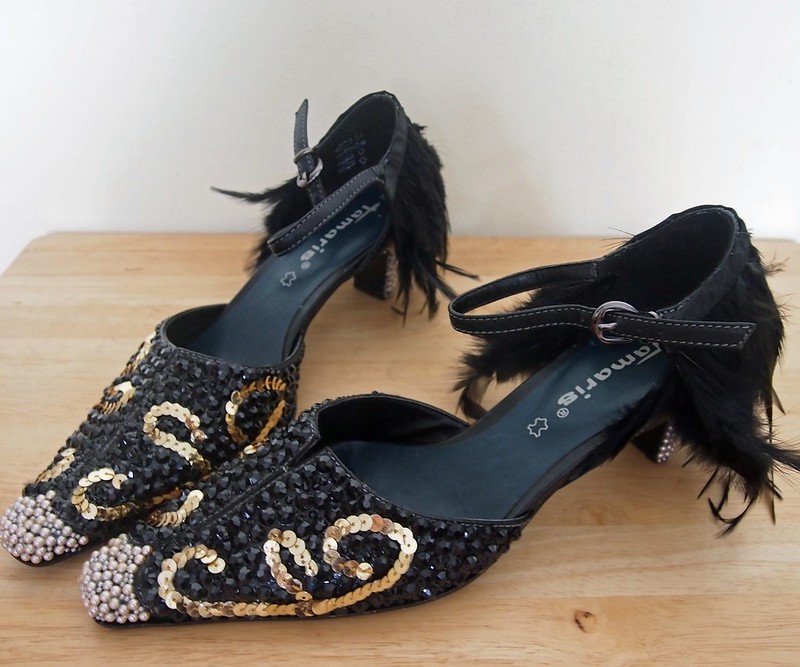
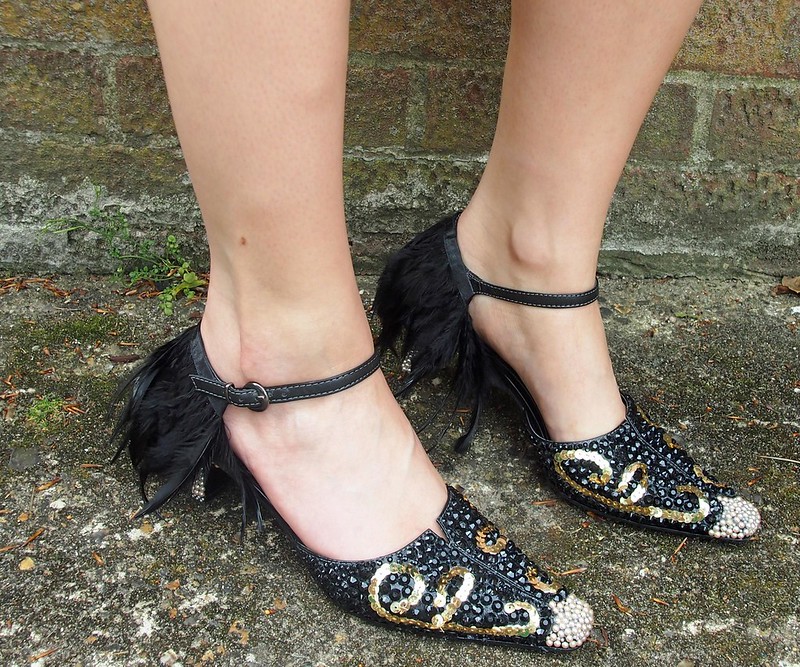
As part of my first History of Fashion/Customisation project at the London College of Style, I was charged with sourcing a pair of 1920s-inspired vintage shoes (plus trims galore) and transforming them into a sight to make a flapper weep (preferably with joy)... and here are the results. As you may be aware, I've dabbled in shoe doctoring in the past, so, this time, I decided to raise the bar a bit, and set myself my biggest DIY challenge to date - beads, pearls, sequins, feathers... and not an apron in sight (#livingontheedge). Read on for all the deep, dark secrets on how I did it...for under £25.

DIY Embellished Shoes Steps 1-3
DIY Embellished Shoes Steps 4-6

1. Gather your weapons

You will need:

  • 1 x pair of shoes (I won this black leather pair on eBay for £9.29, including delivery). The white-stitched sectioning inspired my pearl-encrusted toe-cap and "mirrored" sequin curlicue designs, but you could easily mark these sections onto your own shoes before you start.
  • Gold sequin string - this set me back £1.29 for 5m!
  • Flat back black rhinestones - I used 2 different sizes to add texture - these are 3mm and 6mm, 99p per pack.
  • Flat back pearl beads - again, I used 2 different sizes to add interest - these are 2mm (99p) and 4mm (£1.30), in "champagne".
  • Feather trim - this cost me £3.50 for 30cm, including delivery.
  • Glues - I used Evo-Stik Leather Adhesive (£2.63) for the main body of the shoe, and Scotch Quick-Dry Tacky Adhesive (£3.16) for the heel - feel free to use your own preferred adhesives, but one advantage of these two is that they both dry clear!
  • Tweezers
  • Scissors

(Total Outlay: £24.14)


2. Add your sequins

Spread a generous layer of leather glue over the area in which you wish to locate your sequin design. Cut sequin string to desired length, and arrange in your chosen pattern (my curlicue design was inspired by a motif I spotted on an oriental-style 1920s costume). The glue is tacky, so you'll have some time to play around if your positioning isn't quite right straight off!

3. Add your black stones

Spreading a generous layer of leather glue over the area of the shoe on which you're currently working, gradually cover the main side sections, in-between and around the sequins, with your black rhinestones. I primarily used the larger stones, dotting a few of the smaller ones in to add texture (and fill in gaps!). Fingers are fine for the 6mm stones, but you'll need tweezers for the little ones. N.B. After completing one side of each shoe, I worked on the toecaps, to give the black stones a bit of time to "fix" before starting on the opposite sides.

4. Encrust your toecaps

Working in exactly the same way, cover the toecap section of each shoe in the flat back pearl beads.

5. Bling up your heels

Since I was no longer working on leather at this point, I used my all-purpose tacky PVA for this bit. Spread on a generous layer (don't worry, it does dry clear!), and pop your pearls into position, using the tweezers. This stage was a bit trickier, since this glue was, and stayed, much wetter, for much longer, than the leather glue - so the tiniest knock would send the pearls careering all over the place!

6. Finish with feathers

Once the heels are touch-dry, cut a length of feather trim to fit each shoe, long enough to fix around each ankle-back, from ankle strap to ankle strap, with an extra 1cm at each end to tuck inside the shoe (30cm of trim was just enough for this pair). Spread leather glue along the length of the ribbon trim, and along the edge of the shoe. Press into place - over the next 10 minutes or so, spend a few minutes, on and off, pressing the ribbon section firmly into place, particularly where it tucks inside the shoe, to ensure a firm hold. This isn't necessary in the case of the stones or pearls, but I think it really makes a difference here. You might want to trim your feathers, depending on heel length, but, personally, I fancied that the "trailing-along-the-floor" element added to the opulent "Jazz Age" feel...

Et voila!

Wait 24 hours before trying on to allow all bonds to fully adhere. Then go Charleston!


DIY 1920s Inspired Embellished Shoes 5

Customisation, Embellished Shoes, Beaded, Sequin, Pearl, Feather, Art Deco, Jazz Age, Flapper, Toe Cap, Heels, 1920s, Vintage Style, How To, DIY, UK Fashion Blog, London Style Blogger, Sam Muses

How do you feel about '20s style? Have you got crafty recently?


Join Me On:

 Follow Me On Bloglovin’RSS FeedFacebookInstagramYouTube

Monday, 20 April 2015

DIY Dip-Dye: Superdrug Instant Colour Hairspray in Pink Punch

Marking my last hair-raising hurrah as a blonde and my first foray into vlogging with quite possibly my most extreme venture into colour blocking to date... If it's too cold to omit knitwear from my spring outfits, then by heck, that wool gonna be neon!

For my full review of the hairspray, along with some actual moving footage of today's #OOTD, please take a gander at the vid, and do head over to my brand new YouTube channel and say hello/like/subscribe, should the fancy take you...


Sam Muses, Review, Neon Jumper, Primark, Statement Shoulder, Colour Blocking, How to Wear, How to, Review, UK Fashion Blog, Beauty, London Style Blogger

19 April 3

19 April 4

19 April 2

19 April 2015
Jumper and Dress (Worn as Skirt): Both Primark, Shoes: New Look


Join Me On:

 Follow Me On Bloglovin’RSS FeedFacebookInstagramYouTube


Sunday, 13 October 2013

DIY Embellished Shirt Collar

Sam Muses, UK Fashion Blog, London Style Blogger, DIY, D.I.Y, D.I.Y., Primark, Embellished Shirt Collar, Striped, Stripe, Stripes, Stripy, Boyfriend, Pearl, Pearls, Roses, Rose, Floral, Flowers, eBay, Ideas

If you follow me on Twitter, or live within a 5 mile radius, you may have borne witness to my outrage and despair on discovering that my dentist's orange putty had permanently damaged the collar of my beloved stripy shirt. Yes, it was from Primark, but it had the most perfect tailback boyfriend-style cut I'd ever encountered, and you know how attached I am to my monochrome stripes! Copious quantities of stain remover and much time spent scrubbing eventually succeeded in removing most of the errant orange pigments, but also began to fade the stripes themselves! OK, the final result wasn't that bad, but, since I still seethed with anger every time I looked at it (I did reclaim the cost, plus a little extra to compensate for my extreme distress, but, since the shirts were sold out, I couldn't buy a replacement), there was only one thing for it - DIY!


Sam Muses, UK Fashion Blog, London Style Blogger, DIY, D.I.Y, D.I.Y., Primark, Embellished Shirt Collar, Striped, Stripe, Stripes, Stripy, Boyfriend, Pearl, Pearls, Roses, Rose, Floral, Flowers, eBay, Ideas

Yep, for the first time in nearly 2 years, I got out an actual needle and thread! I used the same eBay pearls and floral buttons as I did for my embellished sunglasses, but as they were actually intended to be used this time! I decided to go for an irregular cluster effect, polished off by 2 of the roses acting as "collar tips", and am rather pleased with the outcome... even if I did have to do some damage control on finding that I'd accidentally sewn the collar to the shirt on one side!! It adds an interesting feminine touch to the androgynous style, no?

Sam Muses, UK Fashion Blog, London Style Blogger, DIY, D.I.Y, D.I.Y., Primark, Embellished Shirt Collar, Striped, Stripe, Stripes, Stripy, Boyfriend, Pearl, Pearls, Roses, Rose, Floral, Flowers, eBay, Ideas, Sheer, Pinstripe, Skinny Jeans, Polka Dot, White Shoes, Boohoo, Court


Shirt and Jeans: Both Primark, Shoes: Boohoo


Follow Me:

 Follow Me On Bloglovin’RSS FeedFacebookInstagramPinterest

Sunday, 23 June 2013

DIY Jewelled Neon Beanie and Clear Clutch

This month's DIY deluge continues... Well, a girl can never have too many embellished and/or neon accessories, can she? Hands up who else has been coveting the blogosphere's sudden influx of translucent neon clutches and super-charged beanies? As soon as I realised the raw materials were already within my grasp, there was no way I could rest until I'd zhuzhed up my very own versions.


The Hat

Twin to my now-studded grey beanie, this New Look number was last seen unadorned in this post. As much as I loved it already, I couldn't resist trying my hand at prettying/crazying it up a bit... So I ordered these flat backed jewels from eBay. With my newly hard-won experience with glue under my belt, the actual process took a fairly hassle-free 10 minutes - simply stick, hold for a few seconds, and go (just be careful not to use too much on the smaller jewels, so it doesn't ooze out).


The Clutch

Having seen both exhibit A: a blogger toting an old translucent neon school folder, and B: another blogger toting an all-but-identical £13 eBay clutch, I knew it was time to raid the filing cabinets for mine! Part of a multi-pack of envelope folders in assorted colours, purchased for under a fiver a few years ago, all it needed was a few more of the jewels I'd used on the hat to add a little wow factor (and conceal the sticky-label residue revealing its former identity as the dumping ground for "Receipts, 2009-2010"). Plastic is a little harder to stick than wool, so you may need to hold the jewels in place for a little longer until the glue is dry if you're trying this out. I may still be tempted by a perspex box clutch, but this is a great standby (and outfit shot prop!) in the meantime.


Are you feeling the urge to bejewel and bedazzle this summer?


Follow Me:

 Follow Me On Bloglovin’RSS FeedFacebookInstagramPinterest