Showing posts with label Sam Recommends. Show all posts

Wednesday, 12 June 2013

Review: Primark Disco Shorts and Charcoal Disco Pants

A couple of weeks ago, I walked into Primark Oxford Street to be greeted by the glorious sight of rack upon rack of disco pants in all shades (including a new emerald variety) and all sizes... accompanied by a full complement of... *drumroll* ... disco shorts (well, almost - the black ones had predictably been pillaged)!

I'd been after a silvery-grey pair of disco pants all year, so popped a pair into my basket, along with the matching shorts (I would have started my collection with black, but needs must). You may have already read my review of Primark's red disco pants here, but since discovering that the various components of their disco range may well be cut from the same cloth, but not to quite the same pattern, I decided that the new pieces merited their own evaluation...


The Shorts


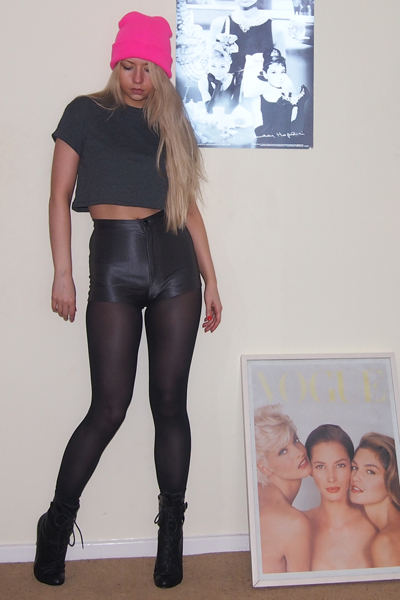
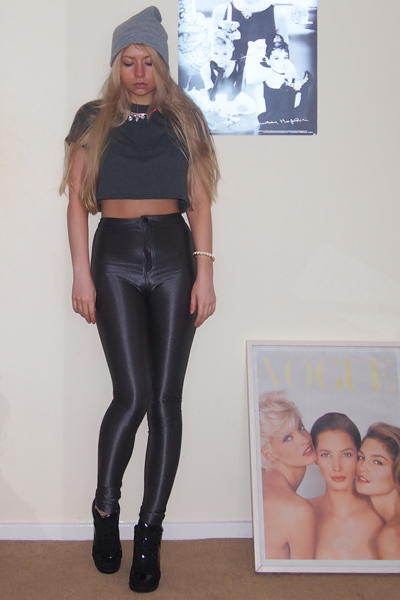
Disco Shorts and Top: Both Primark, Beanie: New Look, Boots: Peacocks (Past Season)

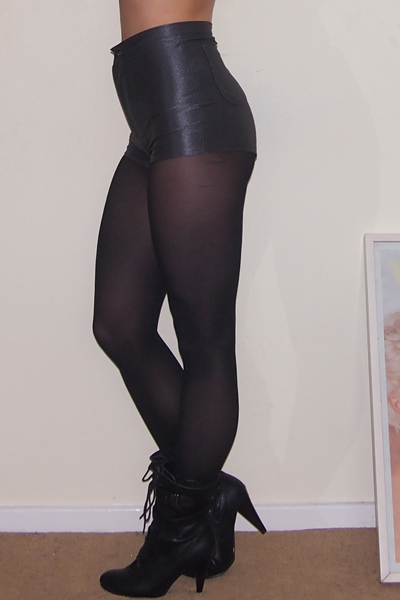
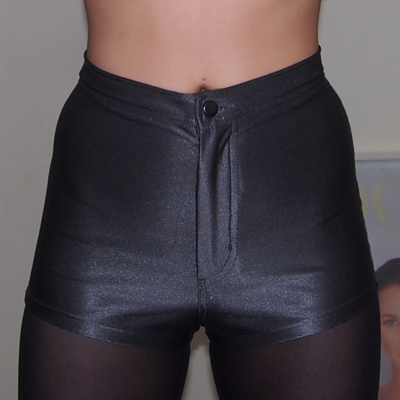
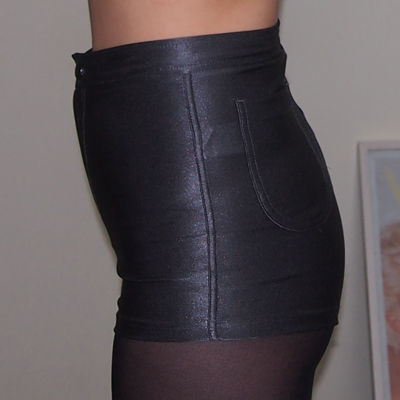
I was surprised to find that these aren't simply a shorter version of the pants - they come up a lot bigger than both the charcoal and red disco pants on me, so don't really "pull in" in the same way, and have a tendency to ride up due to the generous fit at the waist. The pockets also seem to sit a little higher. 

The cut is pretty much indistinguishable from the American Apparel originals, but this does make them rather "cheeky"! Unless you're a real exhibitionist/trapeze artist, you'll probably want to slip tights underneath to preserve your modesty (tip: footless tights tend not to sport that ugly band at the top of the thighs!). Overall, a great value dupe (£12 to AA's £50), but worth trying before buying! Daisy Street appear to cut their £14.99 versions below "cheek level", which may be more conducive to public settings?!


The Pants


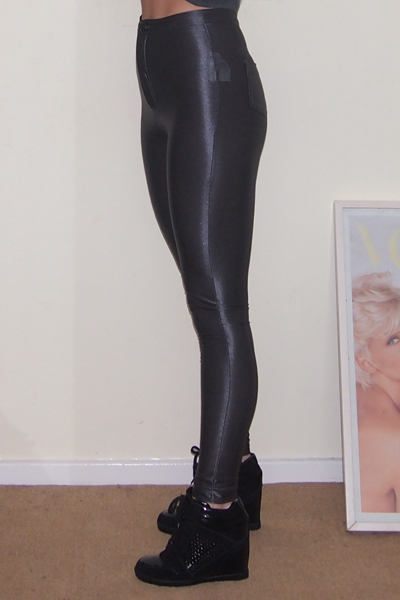
Disco Pants, Top, Trainers and Necklace (Pre-DIY!): All Primark, Beanie and Bracelet: Both New Look

The matching disco pants, on the other hand, turned out to be a significantly smaller fit than either the shorts or my original red disco pants, especially below the knee! Still comfortable, but stress around the ankle/lower calf area when pulling them on caused the seams to split in a couple of places the first two times I wore them, so they sadly already need to be mended/reinforced, an issue I've never experienced with the red ones! Otherwise, the quality and cut (aside from being generally smaller) is similar. As I said in my last review, at £17, I can still see myself eventually purchasing the whole range, although I am trying to pace myself!


Have you disco-ed down to Primark for your dancing trews yet?


Follow Me:

 Follow Me On Bloglovin’RSS FeedFacebookInstagramPinterest

Thursday, 2 May 2013

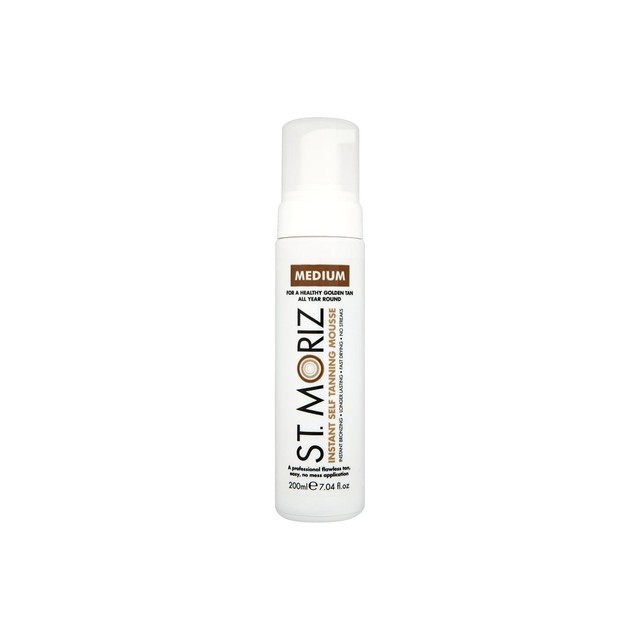
St Moriz Review + My Foolproof Fake Tanning Guide

As our collective hopes of finally ditching black opaques for a few months are probably rising right now, along with a few reservations about bearing skin that's spent too many months hidden under layers of nylon and wool (well, if you haven't unapologetically spent pretty much the whole winter in crop tops anyway, as I have!), I thought this might be a timely post. As much as I admire the unflinchingly porcelain complexions of the likes of Florence Welch, I have to admit to being a dyed-in-the-wool (or from-the-bottle) fake tan addict. I can manage cold (and alabaster) turkey for a few weeks (see below left), but can never hold out on my golden glow cravings for long (see below right), and have been pretty much permanently bronzed for the last decade, despite retreating to the nearest parasol whenever temperatures hit 20C. 


But there are absolutely no excuses for resembling a tangerine, whatever your budget! Over the years, I've tried most of the tanning big-hitters (St Tropez, Fake Bake, L'Oreal, Xen Tan) and pretty much every modality (pro and D.I.Y. sprays, lotions, mousse...) with acceptable, pretty much interchangeable, results from them all, and was resigned to spending £30+ a month on upkeep... until I came across the Cosmo paragraph that changed my life a couple of years ago, introducing me to St Moriz. 
£2.99 (saving around 90% on the prices of brand leaders) from Savers, Amazon or TJ Hughes, I find its results equivalent to, or, yes, even better than those of the aforementioned big names, and the bottle goes further too (I use the mousse, having always liked these best for self tanning).

To obtain optimum results using any self tanner, you do need to put a bit of work in though, so I thought I'd share my top tips (to enable you to avoid recreating the Snow White-to-Pocahontas-to-102nd Dalmatian transformation I underwent on my first attempt!).


7 Steps to the Perfect Faux Glow

  1. EXFOLIATE - This is the most important thing you can do to obtain a natural, even look and maximise your tan's lifespan. Exfoliate your whole body pre-application, paying special attention to hands, feet, ankles, knees and elbows. You can experiment with loofahs, scrubs etc, but I use a good ol' flannel whilst soaking in the bath, then finish off with another once-over in the shower using a (non-oily) body scrub.
  2. MOISTURISE - Very important, as this is how you avoid orange knees and elbows! Just before you begin applying your tan, moisturise your face, elbows, hands, knees, ankles and feet. Unless you have very dry skin, don't moisturise any other areas of your body, as this will dilute the effect of the tanning agent.
  3. WEAR GLOVES - And this is how you avoid orange palms! You can buy disposable vinyl gloves cheaply from most supermarkets. Some people prefer to use a mitt, but I don't find that they add anything beneficial to the process or results, and, if you're not wearing gloves too, the tan can still soak through and Tango your hands! Last thing, carefully peel them off, slap on some moisturiser and squeeze a tiny amount of fake tan onto the back of one hand - rub the backs together to spread carefully over both hands and between fingers.
  4. TIME IT RIGHT - I have been known to go out clubbing after a hasty application, but I wouldn't recommend it - use a wash-off version if you must! After applying a standard self-tanner, you need to wait at least 20 minutes before dressing/sitting down, and 4 hours before showering. If you apply it before bed, be warned that it will rub off on your sheets - I now only buy black bed linen - and it's best to cover up as much as you can (with loose, soft clothing) to avoid any unwanted palm/hair stains in the morning. If you have a lazy day that you can spend wafting (carefully) around in a black maxi dress, great!
  5. CONTOUR - It will probably take you a while to figure out the perfect application technique and "dosage" for you - everyone's skin is different. It doesn't need to appear perfectly even when wet - this colour is just a guide, not how your actual tan will look - but ensure every inch of your skin has been covered, aside from palms and soles - there's nothing worse than a white armpit! Start with one coat and see how you go - I stick to one or two coats, but it's all too easy to become tanorexic - if people start comparing you to daytime auction show presenters rather than asking if you've been away, you probably need to tone it down! You might want to try using more along the sides of your torso and limbs to cheat a slimmer look. Layering additional coats on over consecutive nights is meant to make your tan last longer. I top mine up with a single coat of Garnier Summer Body the morning after. I never use more than one coat on my hands, feet, knees or elbows though - you have been warned! 
  6. BE PREPARED FOR ONGOING UPKEEP - You should use a rich body moisturiser every day (I like the Jergens range) to maintain your tan, and avoid overly hot baths or showers. Most companies claim that by exfoliating "gently" every few days, followed by a reapplication, you can maintain a perfect tan indefinitely. Personally, I think this is a big fat myth - it's incredibly hard to exfoliate at all without inadvertently revealing any glaring white patches! Mine lasts for around 7 days before it begins to peel off in key areas (neck and wrists tend to come first for me), which I take as my cue for another full body exfoliation a la step 1, before I start all over again. Scrubbing off all traces of tan takes me about 45 minutes - soaking in a hot bath for a few minutes first helps to loosen the topmost layers of dead skin so you don't have to work so hard. 
  7. WATCH THE FACE - What looks great on your body won't necessarily work so well on your face -  despite my years of experience, I found it hard to avoid patchiness and clogged pores until I started using products specifically designed pour le visage. Fake tan tends to fade more quickly from the face, but doesn't tend to go patchy - phew! I now use Xen Tan Face Tanner Luxe, which gives great results, is infused with skincare benefits and smells delicious (as do all Xen Tan products actually, one area in which they most definitely beat the competition hands down), and treat jawline up completely separately from neck down, tanning as and when necessary in each case. 


Admittedly a commitment, but a tough addiction to beat once you get hooked... I accept no responsibility for any subsequent substance dependence.


Are you embracing pale and interesting this summer, or going for gold?


Follow Me:

 Follow Me On Bloglovin’RSS FeedFacebookInstagramPinterest

Saturday, 20 April 2013

30 Ways to Save £1

Did you know that 21st April marks the 30th anniversary of the pound coin? I'd assumed it was much older (because anything that happened before you were born = ancient history, right?), but according to my grandmother it still seems like yesterday that everyone was walking around with pound notes and poodle perms (thankfully, today's only legacy is the peplum). Anyway, to celebrate, MoneySupermarket have challenged bloggers to share their top 30 money saving tips - this is a post I've had in the works for a while anyway, since, if there's one thing I'm nearly as good at as spending money, it's hoarding, er, saving it! So here are mine (most of which will save you quite a few round and shiny coins, not just one!)... They're aimed primarily at a UK audience, so apologies to my lovely international readers!


Shopping, Fashion, Beauty and Eating Out

1. Sign up for Daily Deals emails - every day, my inbox is deluged with incredible offers on everything from £4 yoga classes to £250 4* all-inclusive trips to Venice (including flights)! My personal best buy so far is an online web design course, usually almost £1,000, knocked down to an incredible £80. Get on the mailing lists for Wowcher, Groupon, LivingSocial and dealcloud now!

2. I never miss an email from MyVoucherCodes, VoucherCodes.co.uk or VoucherCloud either - between them, they round up most of the best fashion, beauty and food discount codes, some of which are exclusive to them. Never buy anything online without checking for a code first - if there's nothing in your inbox, Google, Google, Google - kind people often share codes on forums. And check for printable vouchers before heading out to eat, or hitting the high street - you can nearly always bag a hefty discount on a weekday meal at Pizza Express, ASK, Prezzo or Cafe Rouge with a little forward planning, and New Look and Dorothy Perkins periodically release vouchers for 20-25% off their wares... If you're running late, download the smartphone apps!

3. Sign up for your favourite stores' email newsletters - exclusive discount codes are often reserved for subscribers, and you'll be first off the mark when sales time rolls around... It can be worth following them on Twitter and Facebook too.

4. If you don't have a discount code, see if you can get cashback - sites like Quidco and TopCashBack pay back either a flat fee or proportion of what you spend on various sites ranging from ASOS to utilities providers, which can be quite substantial - I received nearly £200 for clicking through on my way to signing up for a new TV package online! You can also register your credit and debit cards so that you make a few pennies when shopping at certain high street stores, like Debenhams and H Samuel (hello, bling!).

5. Apparently, expressing your opinion feels more valuable than earning money (hello, fellow bloggers!) - taking part in online surveys is a great way to do a bit of both. My favourite schemes are MySurvey - you can redeem your rewards directly to your PayPal account as soon as you've earned at least £3 (so nice to be able to pay for those eBay impulse buys without having to dig into your bank balance) - and NewVistaLive, which sends you a cheque for £50 once you reach their payment threshold (most surveys pay £1-2, so it doesn't take long once you get into it!).

6. Sell your unwanted stuff. I've made hundreds of pounds selling clothes that no longer fit on eBay - it does take a bit of effort, but bearing a few things in mind makes it more productive: 
  • If you're selling a lot of clothes, invest in a mannequin (which you can buy from, ta-da - eBay, for around £20) - they make everything look soooo much better (discreetly peg at the back if they don't fit) and will increase selling prices. 
  • Make starting bids low - higher prices put people off - but not so low that you'd cry if your stuff actually went for that price. 
  • Make the most of free listings weekends so that you can start bidding at more than 99p, without paying for the privilege.
  • Write an honest but beguiling description - you do need to spell out any flaws, but still make your item seem like a must-have - where would you wear it, and what with? 
  • Read seller guides for more tips. 
Trade books in at Amazon, and check out SellMyMobile.com to see how much you could get for your old phone.

7. Check out outlet stores for massive discounts - M&S have an online outlet, and many top brands sell seconds and end-of-line products on eBay.

8. Get your D.I.Y. on! With a little creativity and a free afternoon, you can save thousands re-creating your own designer dupes and customising your vintage and high street buys.

9. Make do and mend - favourite dress done the splits? Buy a zip repair kit for £5.99! Even if you decide to bring an expert on board, having a zip replaced at your local dry cleaner only costs £10-20 - how much would it cost to replace the whole garment? Ditto re-soling your worn-out shoes...

10. Hire designer threads - try Girl Meets Dress for princess-for-the-weekend dresses, bags and jewellery.

11. Rent out your own stuff! Make some money from those worn-once but too-precious-to-get-rid-of lovelies gathering dust in your wardrobe, and just about anything else, at RentNotBuy.co.uk!

12. Don't be afraid to ask for a discount - I know some people won't buy anything without asking for a discount, but I'm not that cheeky. I will, however, insist upon it if the last garment in my size is marked or has a missing button, belt, whatever (hence my £1 monochrome shift dress!). 

13. Use store loyalty cards (not store cards!) - you can save hundreds of pounds over a year of weekly supermarket shops with Nectar, and bag countless free lipsticks with a Boots Advantage Card!

14. Write reviews - make a little money back on your latest wonderbuy (or big mistake) by writing reviews for dooyoo and ciao! - you'll earn points which can be redeemed for Amazon vouchers and cold, hard cash.

15. Colour your own hair - yes, it may involve a little research and some trial-and-error, but home colourants can give results comparable to, or even better than, salon methods. Switching from a £100 full head of highlights every 6 weeks to a £5.99 packet of Nice 'n Easy (OK, 2 packets, but you know how long my hair is!) has given me more control, more natural-looking results, and more pounds in my pocket!

16. Sign up to photo printing websites like Truprint - they periodically shower you with free prints, and offer amazing deals on personalised photo gifts like calendars, mugs and posters, which are soooo much fun to create - my first port of call for Christmas shopping every year! I use Truprint to create my own Christmas cards too - usually hassle free, depending on the model's mood.

17. One of the few things I haven't tried, but which always sounds intriguing - mystery shopping! You can get free meals and drinks out of it too...

18. And talking of free lunches... you've heard this one a million times, but make your own! I'm not one of those people who smuggles a thermos and foil-wrapped cheese-and-tomato into Starbucks when I'm meeting someone for lunch (well, OK, I may have done that once or twice in my student days!) but if I'm out on my own, I'll hardly ever bother paying for a sandwich or, worse, bottle of water (unless I have so many bags that £1.50 seems a small price to pay for a legitimate place to lay my haul for a few minutes). If you really can't be bothered to spread your own Bertolli, pop into M&S or Sainsbury's for something tasty minus quite so much extortion.

Travel and Holidays

19. If you're entitled to a Railcard, get one! For example, if you're at least 1 day shy of your 26th birthday (damn you!), you're entitled to at least a year to enjoy a third off nearly all off-peak train fares, and you can save even more money and hassle by applying for 3 years at once.

20. And if you're going on a long journey, book your tickets in advance. You can save a fortune on advance purchase train tickets, and coach companies like National Express often offer their first few seats from as little as £1.

21. Driving? Find the cheapest fuel near you at PetrolPrices.com. Make it go further once you've got it by keeping your windows closed, clearing out your boot and going gently on that accelerator!

22. As well as those gold-dust daily deal emails (see tip 1), sign up for newsletters from travel companies like CheapFlights and TravelZoo to maximise your getaway bang-for-buck.

23. Consider hostels - travelling around the world with an average accommodation budget of £15 a day, I only spent one night minus an ensuite bathroom, and never set foot in a dorm. You can book in advance and read reviews at HostelBookers.com.

Savings, Bills and Everyday Expenses

24. Always make sure you're getting the best possible deal on insurance and utilities by using comparison websites like MoneySupermarket (and don't forget to check if you can squeeze some cashback out of it too (see tip 4)).

25. Make your savings work harder by making a point of checking interest rates at the beginning of each tax year - you'll usually need to switch annually to maintain the best rate for you. And make sure your first stop is an ISA, however much cash you have to stash! Many sites have handy comparison tables - a Google search will point you in the right direction.

26. Billions of pounds are apparently floating around in forgotten bank accounts - check none of it is yours (for free) at MyLostAccount.

27. Ensure your mobile phone deal is the best one for you - again, there are lots of handy comparison tables around. If you're on a contract, remember to switch to a (usually much cheaper) SIM-only contract at the end of your minimum term (especially important if you're on a super-pricey iPhone contract). If you don't make many calls, consider Pay As You Go. I don't need an all-inclusive call plan, but what I do need are lots of free texts and unlimited internet access - for the equivalent of about £5 a month on my O2 Pay & Go iPhone tariff, I have everything I need.

28. Turn your thermostat down by 1 degree to save up to £70 a year.

29. Turn your electrical equipment off, rather than leaving it on standby - many appliances still operate at 90% of "full power" on standby.

30. Use white vinegar instead of fabric conditioner - also a lifesaver for mouldering clothes, if, one dark day, you discover your lovely new home has a damp problem!


Hopefully, as well as helping some of you out, each of these tips will save me another pound today, as Money Supermarket are paying £1 per money saving tip to the first 500 bloggers who share their words of wisdom... and one lucky frugalista will be chosen at random to receive £1,000! If more than 1,000 tips are received, the top prize will be increased to £2,000 - phew! Check out the details and T&C to take part.


What's your top money saving tip?


Follow Me:

 Follow Me On Bloglovin’RSS FeedFacebookInstagramPinterest

Wednesday, 10 April 2013

Review: Glam Republic Eyeliner Appliqués

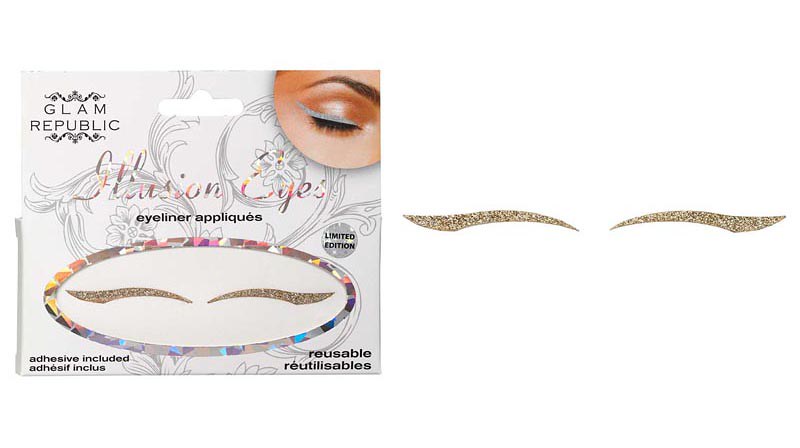
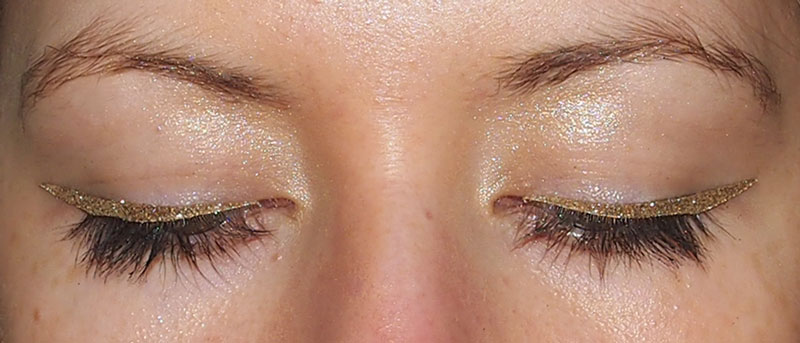
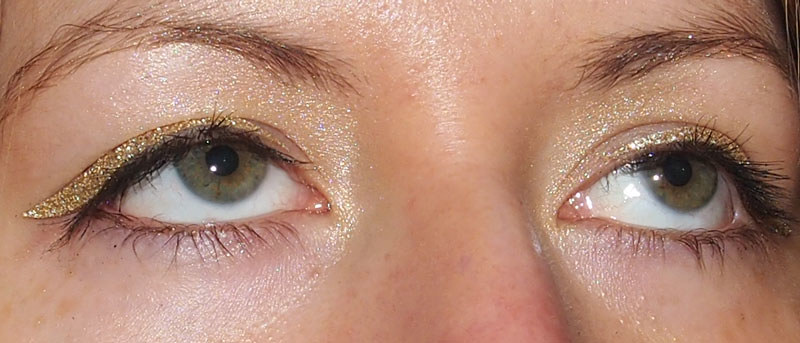
Having spent... ooh... a third of my life thus far (conservative estimate!) perfecting the liquid liner flick (initially, my only option was to whack it on as best I could, then carefully dab concealer over the uneven edges), I'm now a confident habitual user and abuser. However, I'd never been able to make much of a statement with glitter - imagining fairy-dust-framed peepers, I've invested in a few glittery liners, but only ever been able to make out a few ill-defined flakes post-application - harrumph. Enter Glam Republic, and their glitter eyeliner appliqués, launched last year - my grandmother meant to pop these in my Christmas stocking, but discovered them lurking in a drawer 3 months later and presented them to me at Easter instead! I'd not heard a whisper of such creations myself, but then she's often ahead of the times! Since they're re-usable, I wasn't about to wait for next Christmas to try them out, or, in fact, any occasion necessitating the vacation of my bedroom.
Glam Republic


Application

The appliqués are already sticky, but come with a little pot of adhesive for extra security and future use (just like false lash glue) - it took me a few attempts to position them correctly, so I needed to use a little of the additional adhesive on the inner corners, but that set them up for the day.

Just like false lashes, you can trim them to fit your lids if they're too long, but for me they were fine, if not a little shorter than I would have liked - I had just a few more millimetres of bare lid at the inner corners than I would have chosen.

Results

They certainly succeed in creating a defined, dramatic outline and flick, which doesn't look "stuck-on", but would be very difficult to achieve using make-up. My sensitive skin wasn't at all irritated, although I was "aware" of the appliqués whilst wearing them.

In full-length outfit photos, they didn't make the statement I expected, perhaps being too close to my skin tone (I was wearing them in my last post, with my Primark disco pants, but you can't really tell can you?). However, they're definitely dramatic enough to give oodles of pow factor in "real life"!

Removal and Re-Use

A light tug-and-peel had them off with no adverse effects on either lids or liner, and they are now awaiting their next outing (which may actually involve facing the outside world) - you can store them on their backing paper, or on a mirror (one of mine has somehow migrated from my mirror to a lamp - beware, they have a life of their own!).

The Rest of the Range

Eye appliquĂ©s are also available in silver glitter, and in classic black in a variety of shapes and finishes - see the full range here. I'm intrigued by the double sets featuring both thick and fine lines - would love to try them out together, top and bottom (I still struggle a bit with lining my lower lids, since my lashes tend to cause some splatter!) for a subtle(ish) sixties look... Glam Republic also produce false lashes, body transfers and Jessie J-esque lip appliquĂ©s (which I am dying to try!!)

Stockists

In the UK, Glam Republic eye products are stocked in Boots (buy my gold glittery ones online for £5.99) and Superdrug (currently selling black versions in classic, glitter and velvet finishes on their website, from £2.49 apiece). You can also find them in Capello Point stores in Italy, and DI stores in Belgium, and they're apparently arriving in the USA and France soon. Definitely worth a try if you struggle with liquid liner and/or glitter, or just want hassle-free instant glam - and pretty good value considering their indefinite lifespan!


What would your dream eyeliner design look like? I'd love to see a few more colours and experimental graphic designs added to this (already amazing) range.


Follow Me:

 Follow Me On Bloglovin’RSS FeedFacebookInstagramPinterest

Monday, 21 January 2013

Review: Philip Kingsley Elasticizer vs Elasticizer Extreme

Philip Kingsley's Elasticizer products really seem to divide opinion - the original and "extreme" versions have both won numerous awards and afficionados, but also (more than?) their fair share of detractors, so, for what it's worth, I wanted to give you my take.

I first popped the original Elasticizer (created for Audrey Hepburn - you learn something new every day, hey?) into my basket whilst browsing the newly revamped M&S Beauty Hall last summer - I was desperately searching for something to take the edge off my increasingly dry, brittle and unmanageable hair, and magazine article upon magazine article had conspired to imprint me with a vague but unmistakeable impression that this was one of my best bets, crystallising when I first caught sight of it in real life.

As I told you in one of my first posts, I found it a lifesaver (or at least a mane-saver) - I'd thought my only viable option, if I wasn't prepared to continue to spend over an hour a day detangling, was to lop a foot or two off my hair length, but, instantaneously, my hair became much more manageable, with dramatic decreases in breakages and brushing time. Once I'd squeezed out the last scrap, I decided to try the Extreme version, rationalising that, if the standard version was that good, surely the "extreme" option would be even better... However, as with the John Frieda Full Repair range, I actually found that the standard version worked better for me!


icon


How Do They Work?

Both products are pre-shampoo conditioning treatments and come with identical instructions - work into damp hair, cover with a plastic cap (I also wrap a turby towel around the cap), leave for 10-20 minutes, rinse off, and follow with shampoo and conditioner as usual. 

Manageability During Washing and Drying

After using the original Elasticizer, I noticed no difference in my hair whilst still wet, or during blow drying. When using the Elasticizer Extreme, I did find my wet hair much easier to manage, comb and dry, with fewer breakages.

Winner: Elasticizer Extreme

Appearance and Manageability After Drying

I was never unhappy with the appearance of my hair, only its lack of manageability, so, although neither of these products really made a visible difference in terms of shine or anything, that wasn't really my goal anyway. I was pleased that neither weighed my hair down or compromised on volume, although I do feel I slightly prefer the appearance of my hair after using the original Elasticizer vs the Elasticizer Extreme (which I think may just be adding the teeniest bit of frizz). 

My hair was significantly easier to manage until my next wash after using the original version - fewer tangles and breakages, and vastly reduced brushing time. With the Extreme version, to be perfectly honest, I noticed little to no improvement over regular shampoo and conditioner in terms of manageability, however much I used!

Winner: Original Elasticizer

Long-Term Effects

Any effects obtained initially last until the next wash - I do think that, as claimed, using the original Elasticizer over a prolonged period of time may have given my hair more long-lasting strength though - a moisturising shampoo and conditioner alone now give almost the same effects as I could originally obtain only with the treatment (I suppose this may go some way to explain why the Extreme version didn't then affect me so dramatically?!). The original version also provides some UV protection and is meant to help retain colour.

Winner: Original Elasticizer

Would I Recommend Them?

I would have no hesitation in recommending the original Elasticizer to anyone suffering from dry, brittle and/or unmanageable hair. If you've tried the Elasticizer Extreme and it hasn't worked for you, don't be put off testing the "standard" version! Having said that, don't necessarily let my experiences put you off trying the Extreme version either - different products have different effects on different hair, and I assume at least some of those beauty editors who spend half their time raving about it must genuinely believe in it!

Where to Buy

You can order directly from the Philip Kingsley website - they stock several sizes of each product, including 20ml samples for £3.70, and offer a reward scheme, useful if you do become an addict - you can also read tons more customer reviews... Or there's always good old M&S!

Disclaimer: I have incorporated some affiliate links within this post, so, if you do decide to purchase any products after clicking on them, I will earn a few pennies, but I promise that, as ever, this has in no way compromised the honesty of my review - I had planned to write this post long before I was even aware of the existence of an affiliate program.

Have you tried either of these products? Do you swear by any other hair treatment gems?


Follow Me:

 Follow Me On Bloglovin’RSS FeedFacebookTwitterInstagramPinterest

Wednesday, 7 November 2012

How to Store Your Clothes, Jewellery and Accessories Gorgeously...

This week, I finally put my gladiator sandals, floral crop tops and straw hats into hibernation and dug out my thigh high boots, statement knits and cossacks... Quite impressed that my "Spring/Summer" wardrobe managed to hold its place on my rails for 7 months this year, without me getting too chilly! It's been a year now since I first had to admit defeat and put 4 sacks and 2 jumbo boxes of clothes and accessories into storage, because my poor (5) wardrobe(s) just couldn't hold my entire collection anymore, and I was virtually sleeping under a pile of shoes.

It took me 7 hours to reorganise everything this time (with a couple of tea/Kardashians breaks) but it definitely has its advantages (like a free bundle of "new" outfits to unwrap every 6 months - you will be much more excited by that summer dress next year if you haven't had to flick past it to get to your snuggliest jumper every other day from November to April, trust me), so I thought I'd share a few tips for those of you who need to claw back some space, or just don't care to be reminded of your tropical holiday-wear when it gets dark at 4pm and your car's stuck in the snow.

I also wanted to share a few solutions for storing jewellery and accessories (which still allow you easy everyday access), that have saved my life, or at least my sanity.


Part 1: How to keep your jewellery, bags, belts, hats and scarves under control, beautifully


Part 2: The Seasonal Switchover - What to keep, what to stash, what you need and how to do it...


What to Do When Overrun with Bags, Belts and Jewels...


or Help! I Can't See My Carpet for Clutches, and My Jewellery is Just a Giant Knot!


Sound familiar? Oh yes, I lived like this for years, and I think it took a few days to finally unpick the jewellery! Everyone knows the old "clear stacking boxes with Polaroid labels" trick for shoes, but I wanted to share a few tips and tricks which I've personally found far more useful...


Bags, Belts, Hats and Scarves


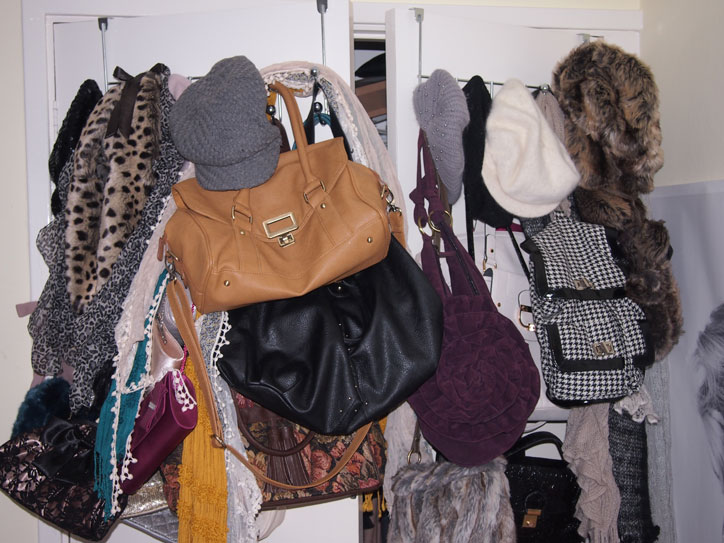
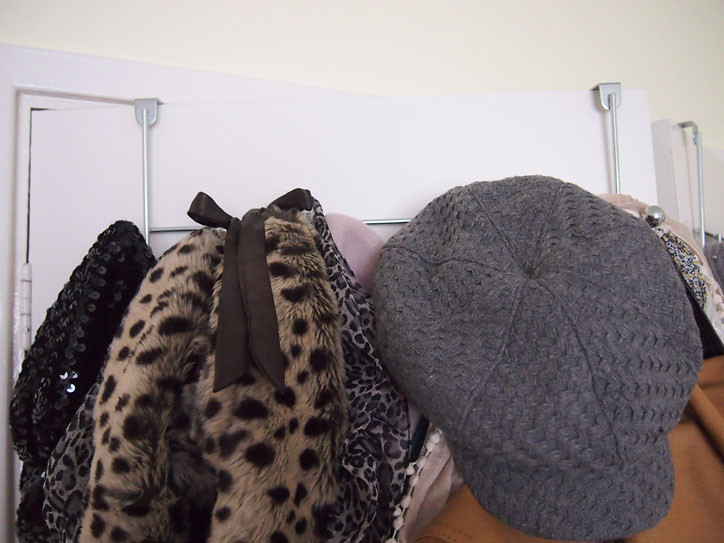
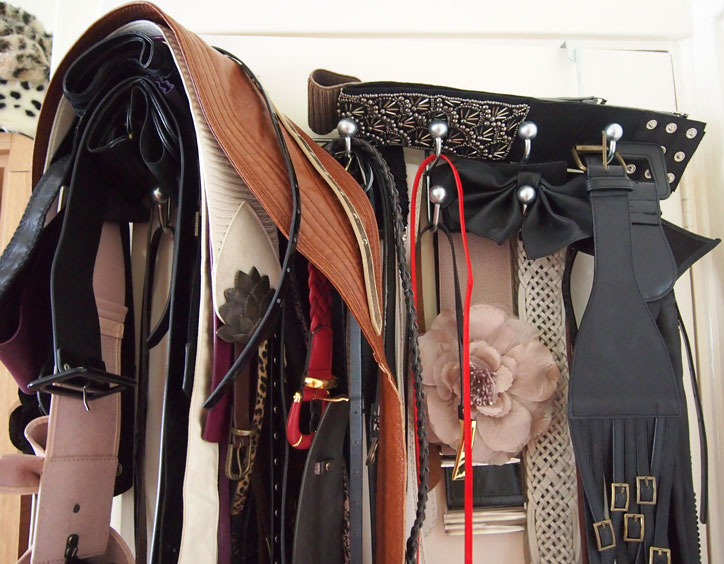
Towel hooks - those ones that slot over your bathroom door - stick them on your wardrobe instead. I got mine from Argos for less than a tenner each - have a look around - basic chrome is always elegant, but there are plenty of other styles which might better fit your personal taste (although, if you're anything like me, you won't be able to see much of them anyway!). If you want to use them for belts, try and find some with horizontal slats which will allow you to slide your belts over and around them (if there's enough space between the hooks) as well as over the hooks themselves.


Jewellery


Best for Statement Necklaces and Overall Storage
If you are a serious magpie, the beautiful but functional Swag Bag should be your first stop -  I have the maximum size (of course) but you can buy whichever best suits your collection - you can read more about them and order here, but they hook over any door, roll up for travel, and have lots of little velcro tabs for easy attachment and release of necklaces, bracelets etc, as well as a pop-on-and-off bar for rings, bangles, hairbands etc, and pockets to keep little treasures safe, made from mesh - from which you can hang earrings! There are also plenty of surfaces onto which you can clip brooches and hair accessories. And they ship to anywhere in the world...


Best for Earrings
I use a plastic folding screen covered in little holes to display my earrings, bought very cheaply on eBay and so good for allowing you to see at a glance which pair will go best with your outfit. You can also buy beautifully ornate metal versions, such as this one.


Best for Bangles
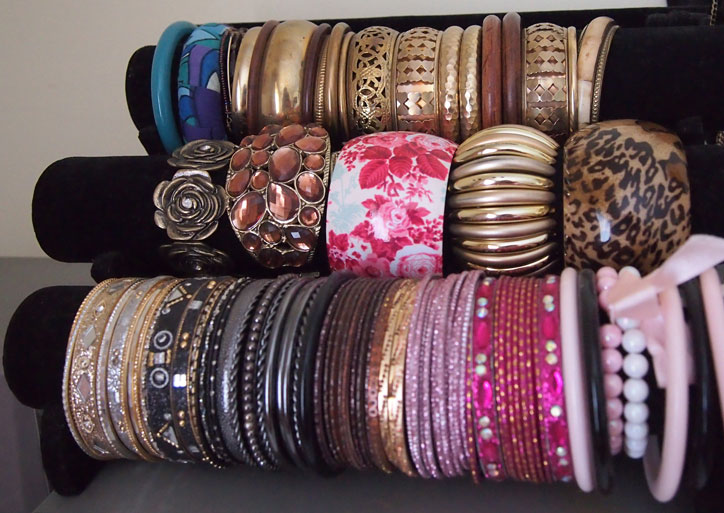
Another eBay find - this kind of velvet bangle holder is most commonly used by jewellers and watchmakers, but why shouldn't the paying customer make use of them too? So elegant, and so much more space-economical than letting your arm swag spill all over your dressing table.


Best for Show Offs


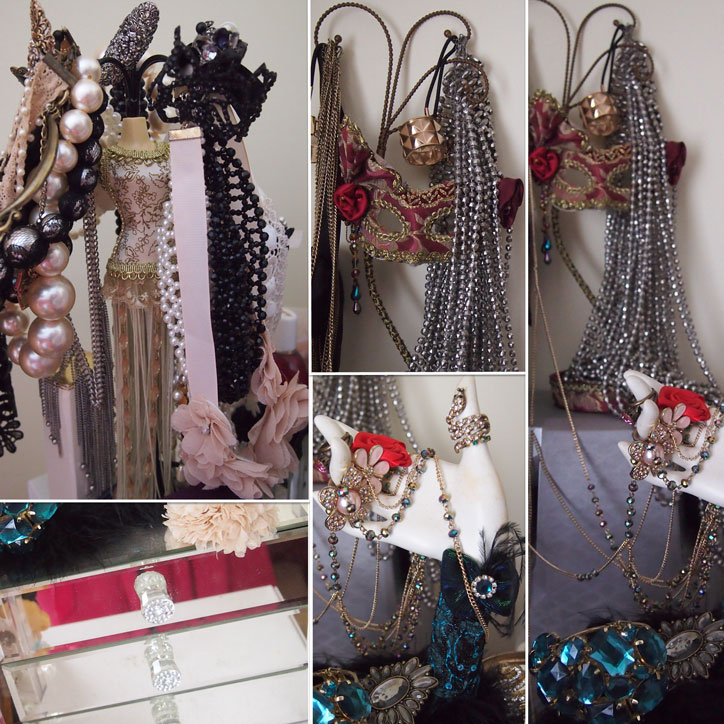
The primary purpose of the jewellery tree is decoration, rather than utility, but it still packs a fair storage punch and beautifies your personal space like nothing else - mannequins (in a myriad of styles and outfits) are widely available, but delve a bit and see what else you can find - I love this masque version. They make gorgeous gifts.

Ring lovers can perch a few on the branches of their trees, but a ring hand makes a truly glamorous statement, as well as a dedicated storage unit - this one was a present.

And finally to the classic jewellery box - if I could, all my furniture would be mirrored and art deco style - I mainly use these drawers to store boxed items, as I like to keep most of my costume jewellery on display so that I'm constantly reminded I have it, and to stop it becoming tangled, but they sure look purdy... you could use them to store less pretty but essential trifles instead - rubber bands, spare buttons, safety pins... who's to know eh? These are from M&S - who always bring out a gorgeous selection of jewellery boxes at this time of year - just wandering around the gift section brings a sense of all being right with the world.


The Seasonal Switchover: Keep or Stash?


OK, time to take off the cocktail rings and roll up those embellished sleeves... The degree of ruthlessness required here is primarily determined by spatial constraints - my three or four Santa-sized vacuum sacks and two 20 litre boxes of shoes, hats and bags actually make up far less than half of my overall haul - if you're a fashion blogger/obsessive, you'll already know how many items you can take from season to season and layer up for different effects - it's half the fun of getting dressed, right? So...

Keep Within Easy Reach...
  • Trans-seasonal staples - shirts, T-shirts, skinny jeans, midi skirts etc etc
  • Anything you have a hankering to layer up with tights, boots, knits, long-sleeved tees, roll-necks etc - some playsuits and minidresses will work brilliantly, depending on colour, print, style and fabric
  • Dark/rich toned floral garments
  • Shorts, miniskirts and cropped trousers in tailored or heavier fabrics, like wool or leather, and/or dark/rich/monochrome shades
  • Maxi and mixi skirts and dresses - perfect for chanelling the gothic and Edwardian vibes, or layering with boots and knits for a boho daytime look
  • Crop tops in dark/rich tones to pair with high-waisted separates, and embellished sheer versions (like the ones in this post, still available in Primark) in all shades for Great Gatsby-style layering
  • Anything which is likely to become a horrible mess and require hideous amounts of iron-love after being folded for 6 months - I always leave out my pleated skirts just in case, along with anything which I know creases terribly
  • When switching to summer, a couple of emergency jumpers and warm jackets!

Stash 'til Next Season...
  • Overly-summery florals - florals are huge this winter, but I tend to prefer a darker background and perhaps a slightly more oriental feel to a tropical/ditzy print on a white or pastel base for AW
  • Overly-summery crop tops - again, you can certainly take a studded bralet right through this season and out the other side, but you might not be sporting your highlighter pink mini vest to your Christmas party
  • Pastels, whites and brights that it would just feel wrong to wear in winter - don't get me wrong - I love winter white, and plan to try teaming a white chiffon blouse and skinnies with tough black boots this season, but my broderie anglaise is not seeing the light of day until next spring. Likewise, my bright orange, scarlet red and neon yellow skirts are staying firmly put, as would a Chanel-style pastel boucle suit, if I had one, but I can't imagine wearing lemon jeans again until at least March - N.B. - White flares are only acceptable in temperatures over 15C
  • Pedal pusher-style capri pants - a flash of patterned knee-high peeking out from under the hem of a peg leg trew is elegant and sexy, but a whole calf-full?
  • Excessive nauticalia - personally, I've retained my black and white striped garb, but stashed anything navy and white - otherwise it would ruin the excitement of reclaiming sailor chic each and every March!
  • Anything which you've worn so much that the sight of it currently bores you to tears - after 6 months of enforced separation, you'll probably be ready to welcome it back into your life with open arms!


You Will Need...

  • Storage containers: I use clear boxes on wheels for my shoes and accessories so I can see at a glance what's inside - if you intend to keep them under your bed, measure the space available first and make sure they'll fit before you buy them - include an extra couple of centimetres for the wheels (I didn't - so they have to live at the bottom of a wardrobe, hence defeating the purpose of the wheels)! Vacuum packing sounds like a fantastic idea for clothes, and it looked foolproof on QVC, but the bags I got (from Play.com, last year) are not airtight when the valve is closed, so all the evacuated air seeps back in within seconds, and I just use them as standard storage sacks! So if your heart is set on vacuum packing, pick a well-reviewed product!
  • Motivating tunes on your headphones - I was clever/fortunate enough to pick the day Robbie Williams' new album came out, and also finally got around to downloading the "new" Garbage album during my first break (6 months after its release).


Instructions:

  • Remove all unseasonal fare from wardrobe(s) and drawers, carefully fold and arrange in chosen storage containers. Stash.
  • Re-organise remaining clothes and accessories in a pleasing manner - it really is the best way to stay aware of what you actually own if you have a lot of clothes, making it far easier to choose what to wear, find what you're looking for and prevent the purchase of near-duplicates! This season, I have "one-piece" (dresses, playsuits and jumpsuits), "tops and light cover-ups", "bottoms", "jackets and coats" and "evening" wardrobes, with pieces arranged first by garment type, then length, and finally colour!
  • If you've done this before and already have a stash of new-season-appropriate clothes ready to replace the emigrants, fit them into the appropriate places within your new scheme, but take a good look at each piece first, as you may well see it with new eyes after its absence - have you instantaneously conjured up an ingenious new ensemble to centre around it? Or do you really need to let it go now, since it's looking more than a little bobbly after 5 years of loyal service, and that stain is never going to come out?
  • Reward yourself with wine/chocolate/Gossip Girl/sleep.


Follow Me:

 Follow Me On Bloglovin’RSS FeedFacebookTwitterInstagramPinterest