OK, cracking on with resolution #1 (more hair and DIY posts), I thought I'd show you my take on the beehive. I don't know about you, but I hate backcombing - I can never seem to do it properly, and, if I do (or, more likely, someone else does), brushing it out takes about 3 hours and involves many breakages... So I have to get a bit creative if I want to try out my favourite retro 'dos. This is how I create my much-easier-than-it-sounds-or-looks full beehive up-do. It's a great day or evening look for day (or two) old hair, suitable for anyone with shoulder-length or longer hair. Slightly messy is, thankfully, acceptable for an effortlessly chic look, or you can go super-neat for a Grace Kelly feel.
You Will Need:
- Dry shampoo (optional)
- Brush or comb
- Hair elastic (ponytail holder)
- Hair doughnut (optional)
- Kirby grips
- Hairspray (optional)
How To:
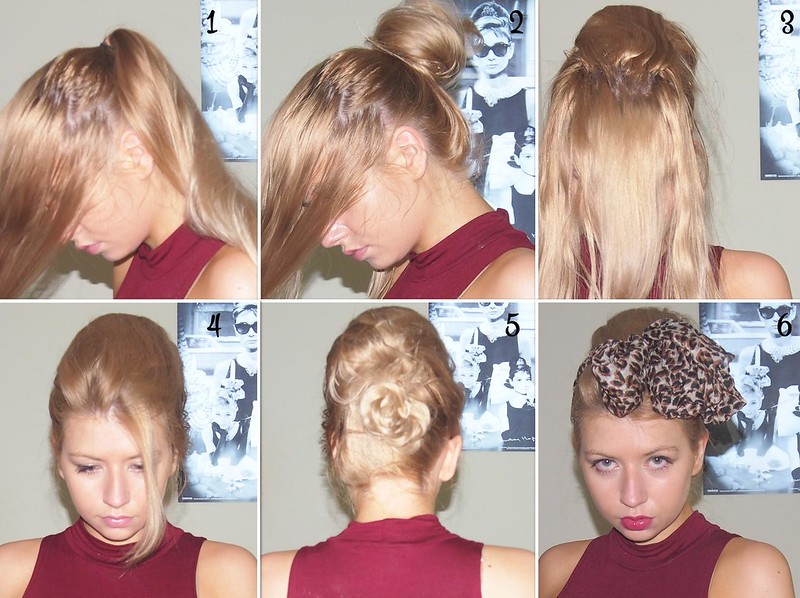
- Apply dry shampoo, if you have it, to give your hair some "guts" in the absence of backcombing. Section hair into two sections, front and back, from ear to ear - this doesn't have to be too neat, as no one will see this bit! Pull back section into a high ponytail.
- Twist ponytail into a bun - ideally, use a hair doughnut for added padding and shape (slip it over the ponytail, then wrap the ponytail around it section by section - I usually divide into 3 or 4 - pinning the ends underneath as you go).
- Begin to drape sections of hair from your "front" section up, over and around the bun (yes, this is the front view - you can use sectioning clips if you prefer more vision!). Pin securely at the base of the bun. I tend to start with the "back" of the front section, followed by the front and sides.
- Continue until the entire front section has been pinned - you can leave your fringe or front sections loose if you so desire. Mist with hairspray for extra hold.
- If you have very long hair like mine, you might be left with some loose ends - if you're very meticulous, you can try and "tuck" them in as you go - otherwise, do whatever you like with them - this time, I put mine in a braid, which I then coiled up and pinned beneath the beehive.
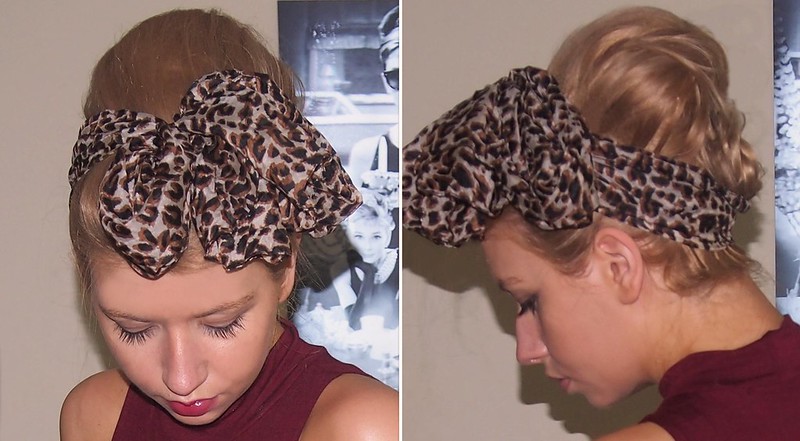
- Although you can leave as is, beehives look great with hair accessories - slides, Alice bands or a silk scarf for extra vintage va va voom (and/or to cover up not-so-neat sides!). Red lipgloss optional.
Follow Me:


![Twitter]()


What a great tutorial, thank you!
ReplyDeleteI've always wanted to do a beehive but my hair is so thick that back-combing is incredibly painful.
I'll give this a go :) xx
http://montageme.blogspot.co.uk
You're welcome, hope it works for you :) xx
DeleteI love this hairstyle, SO pretty!
ReplyDeletexx
Kelly
Sparkles and Shoes
Thanks Kelly Ann :)
DeleteYour hair is gorgeous, I need to try this!
ReplyDeletehttp://alittlebitunique.blogspot.co.uk/
x
Thank you! Yeah, give it a go :)
DeleteBeautiful hair style .. looks so pretty on you.
ReplyDeleteWhat mascara are you using? Your eye lashes look so long :-)
Monica
www.pear-shaped-gal.com
Thanks Monica :)
DeleteI use L'Oreal Lash Architect - I just noticed that when I proof-read the post haha, looked like I was wearing falsies for a minute!
Your hair is stunning!!!^^
ReplyDeletexoxo
Thank you!
Deletebeautiful hair style!
ReplyDeleteXOXO
Arianna
http://aryannastyle.blogspot.it/
Thanks Arianna :)
DeleteSuch a good idea! When my hair grows out a bit, I'm gonna try this. Thank you xx
ReplyDeleteYou're welcome, looking forward to seeing the results :)
DeleteI am just a mess while I tryto backcomb my hair, and this is such a great tutorial! thanks for sharing, I defintielly have to try this at home!
ReplyDeletexo
MAria C
http://shoesandgloss.blogspot.com
Ah thank you, would love to see this look on you :)
DeleteThis is such a great tutorial! I'll definitely give this a go! :)
ReplyDeletehannahsfashionblog.com
Love this hair do! You look great :)
ReplyDeleteThank you :)
DeleteWow! Amazing hair-do! Love it... looks stunning!
ReplyDelete♥, Jo
http://www.StyleAt30.com
{Style + Travel}
Thank you!
Deletelove this so much! can't wait to read more! keep it up girl!
ReplyDeletelove, rach.
www.so--hi.blogspot.com
Aw thank you!
DeleteHello, Sam! How are you? Oh, loved your beautiful pictures and your lovely hair! Actually, I love such kind of hair style - it's so charming and very feminine. I know that, depending on the style, doing so can be quite laborious... But, as always, you look so beautiful :)
ReplyDeleteAll the best,
- F.
Hello Flávio! I'm very well thank you, how are you? Ah thank you so much for your lovely comments, I'm glad you liked the post :)
DeleteYou're welcome Sam! Oh, I'm glad you're well and I'm fine too, thank you! And thank you for always being so kind with my comments :)
DeleteHave a great weekend!
xxx
Great hair tutorial! Will have to try this and give my hair a break from backcombing :) xx
ReplyDeleteThanks Sadie, yep definitely worth giving it a try :)
Delete